
I built a full evaluation system for RAG agents running in n8n and I want to show you how I do it. I recorded a video walking through everything, and this article captures that workflow in written form. I’ll explain why random “vibe testing” doesn’t scale, how to create a ground truth data set, how DeepEval fits into the picture, and how I deployed a REST wrapper so n8n can run automated evaluations against real workflows. You’ll also see how I generate synthetic test cases from documents and how I store and report results in Airtable.
Why one-off testing fails
Most people build an AI agent in n8n and then try to see if it works by throwing lots of different questions at it. They change the system prompt, swap models, tweak settings, and test again. That method feels fast at first. It allows you to get a prototype running quickly. It also leads to a lot of noise.
Fixing one issue often creates another. You spend hours on a patch that seems to improve one case but breaks three others. After a few rounds, you lose track of whether your changes actually improved the system. You can’t tell if the change helped or hurt without a repeatable, measurable test. That uncertainty compounds when the agent goes into production and real users ask questions you hadn’t considered.
Adding nodes to the canvas is easy. Making the system accurate and reliable is the hard part. To move from guesswork to confidence, you need an evaluation mindset.
The evaluation mindset and ground truth data
I adopt a simple rule: before I write a single line of code, I create a ground truth data set. This set captures the user intents and scenarios the agent should handle. It also defines what’s out of scope. That boundary is important because AI systems today still need to be highly specialized. They can’t be general-purpose experts and remain reliable for domain-specific tasks.
Creating the ground truth is more work up front. It saves far more time later. You make changes to your agent with confidence because you can measure the effect of those changes. You don’t just rely on gut feeling or ad-hoc tests.

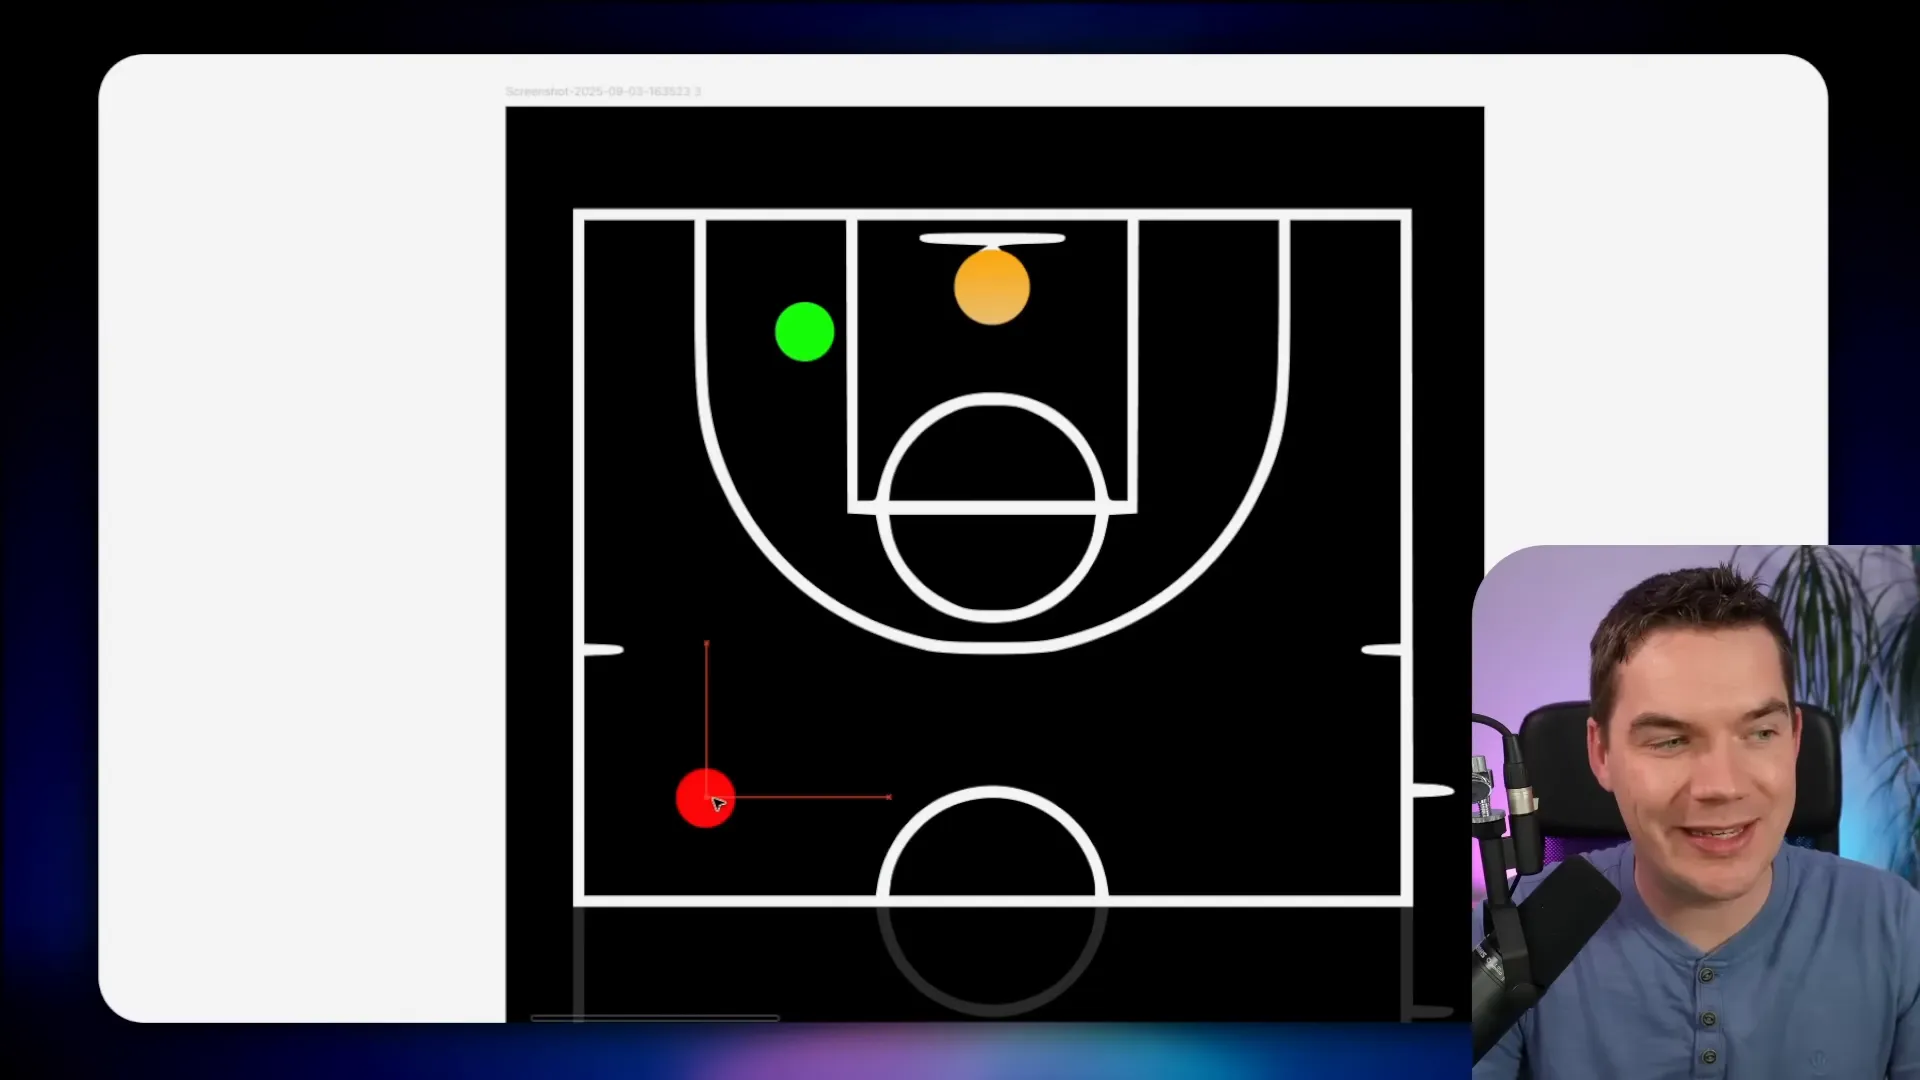
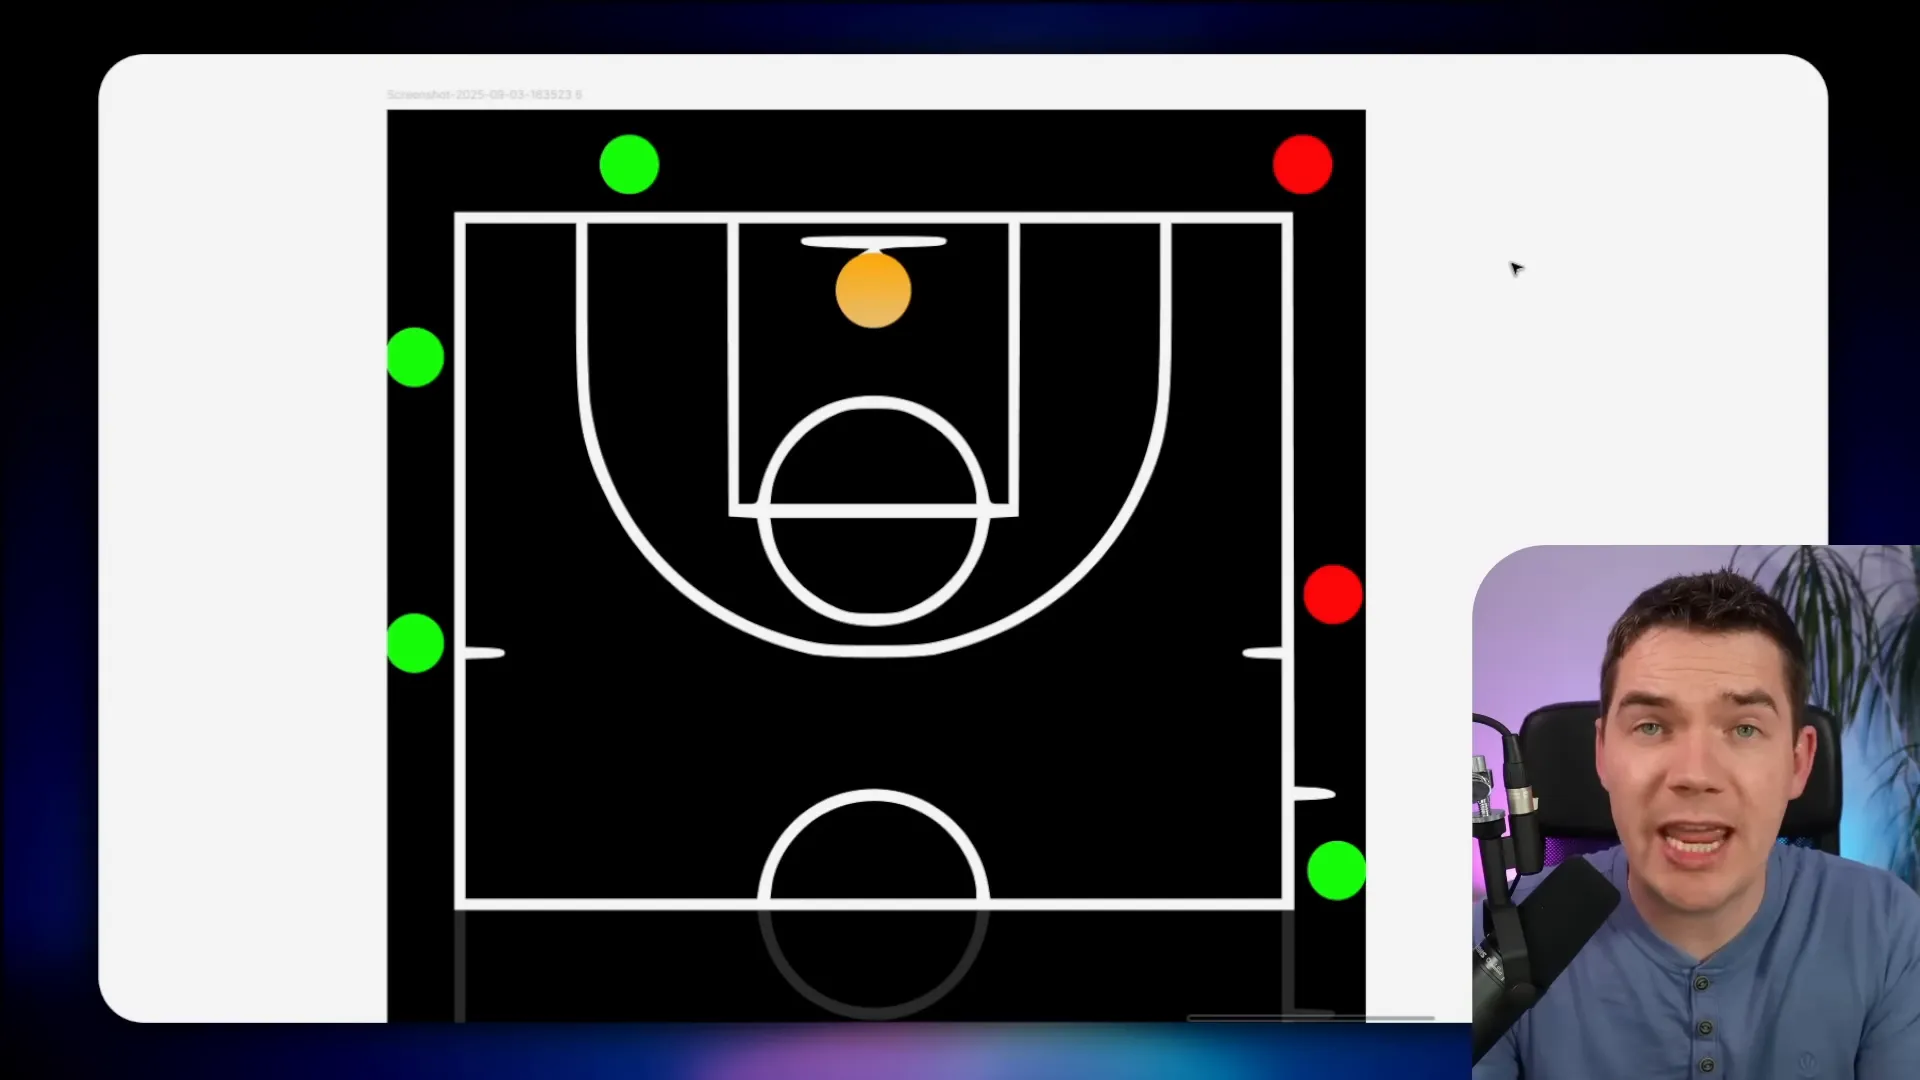
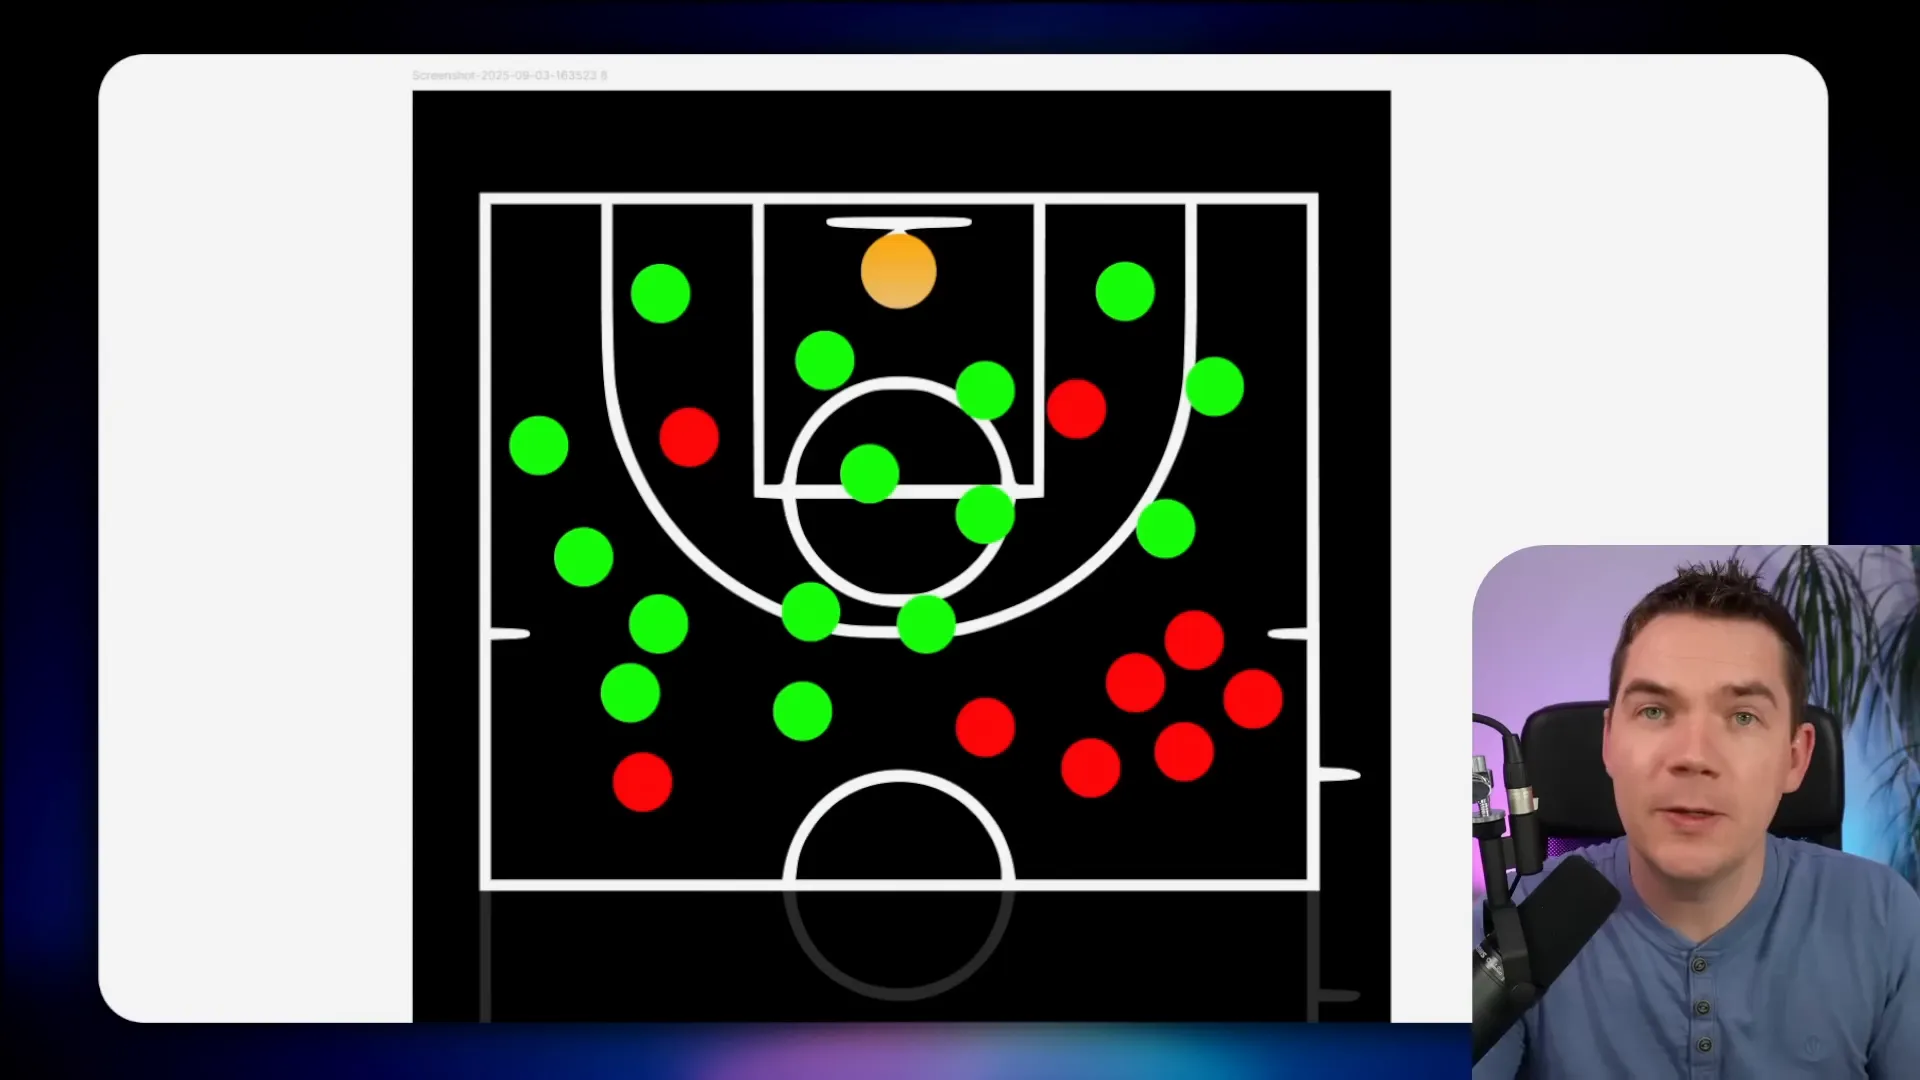
The basketball-court analogy
I borrow an analogy from Edo Pesach. Imagine a basketball court. Each dot on the court is a test case. Green dots are made shots. Red dots are misses. Distance represents difficulty. Close shots are easy. Long shots are hard.
In a RAG chatbot for e-commerce, an easy dot might be “Do you deliver to Alaska?” A much harder dot might be “Is the blue sweater that was on the home page yesterday still on sale?” The former is a quick policy lookup. The latter needs cross-referencing page history, product IDs, and possibly other systems. It may require tools and reasoning.
Boundaries matter. Answering “Who was the 29th president of the United States?” might be correct, but it’s out of scope for an e-commerce bot. That test would be green but out of bounds. Evaluations should focus on the court, not the grass outside it.
Common eval mistakes
- Focusing on out-of-scope questions. That wastes time and gives a false sense of capability.
- Clustering tests. If all test cases look the same, you won’t discover weaknesses across different features. Spread tests across categories and difficulty levels.
When you visualize your tests across the court, you’ll quickly spot clusters of failures. Those clusters tell you where to focus improvements. Then you run the full set again and see which tiles flip from red to green. That evidence proves whether your changes improve accuracy.
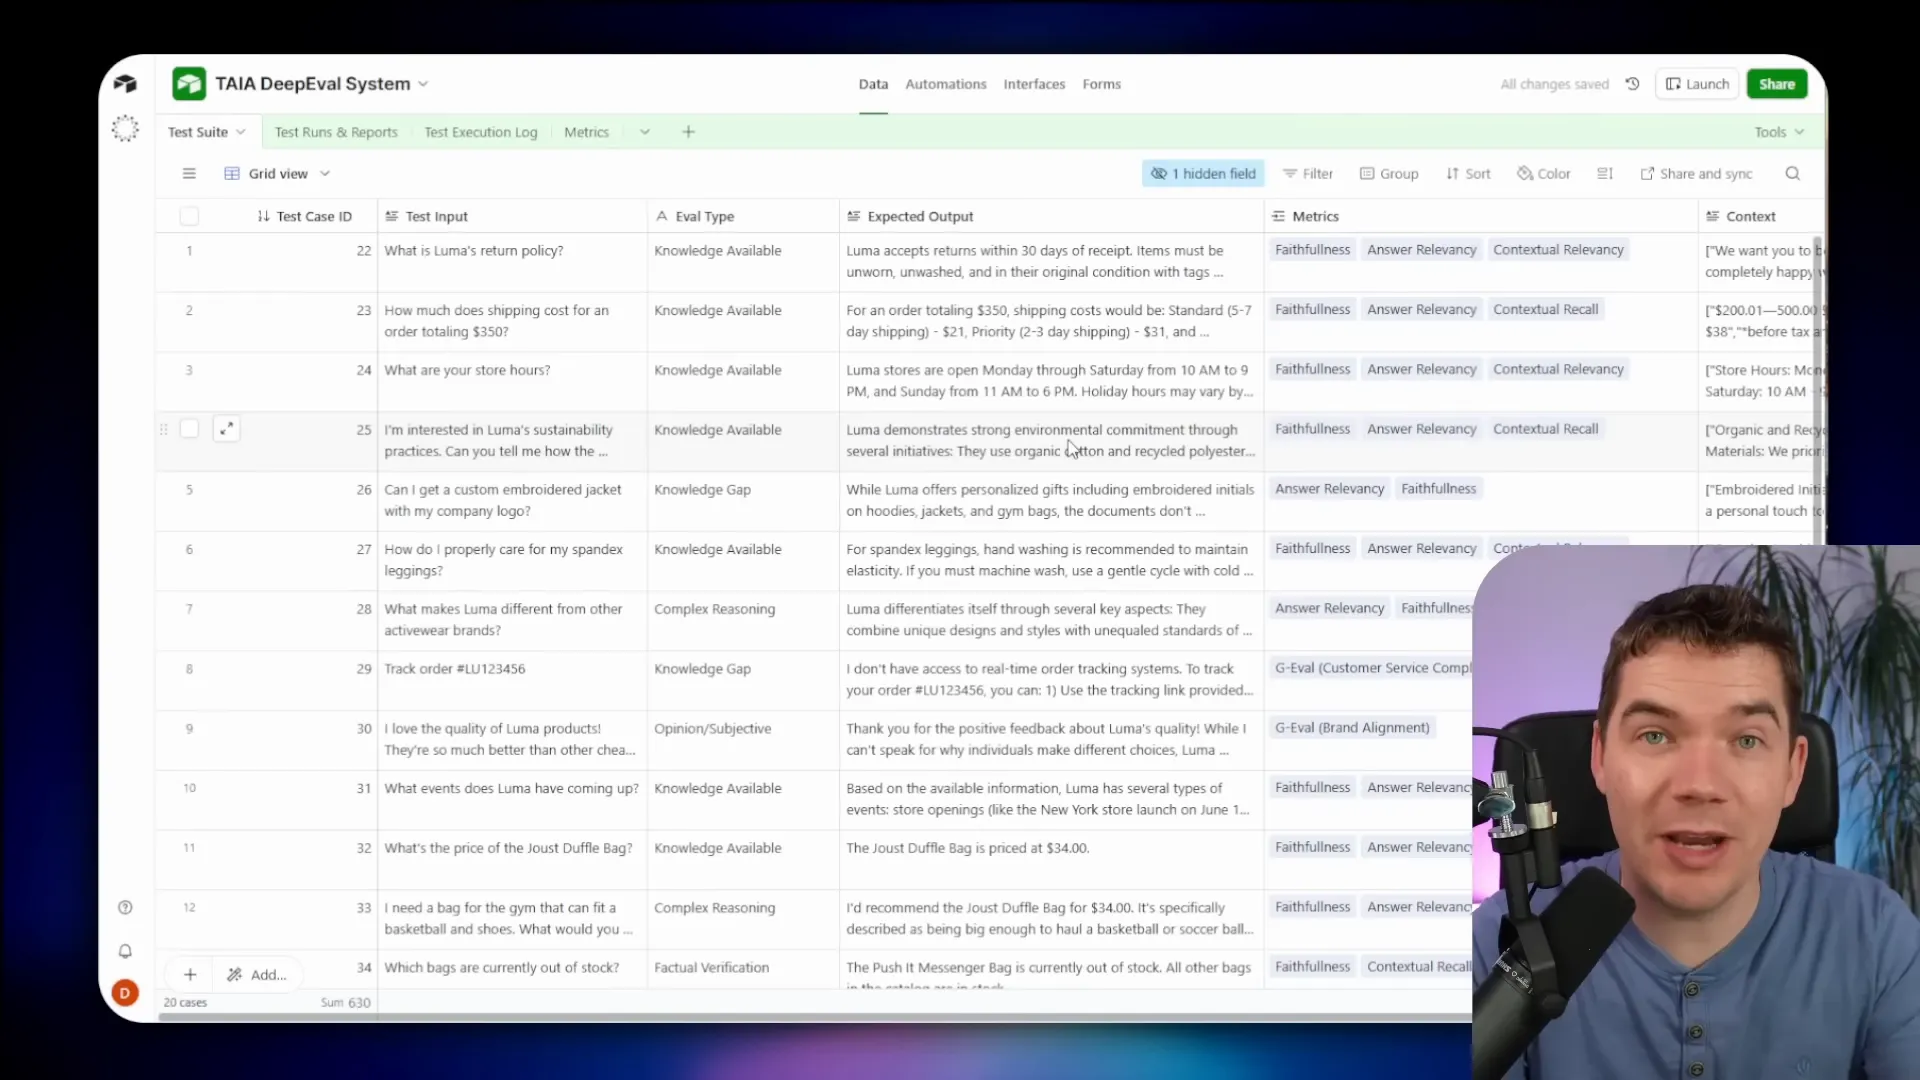
How a ground truth dataset looks in practice
At its most basic, a dataset is a sheet with question and expected answer columns. I recommend capturing at least 20–30 representative queries before building an agent. Write the expected output for each query too. This forces you to define scope and success criteria.
Then follow a testing rhythm:
- Build a quick prototype and vibe test it to reach version 1.
- Run your 20–30 test battery to see how it behaves.
- Make targeted changes and run the full set again to produce version 2.
- Repeat. By version 7 or 8 you’ll have objective evidence of the agent’s accuracy.
That approach is what separates hobby projects from production-grade systems.
Why Airtable over a spreadsheet
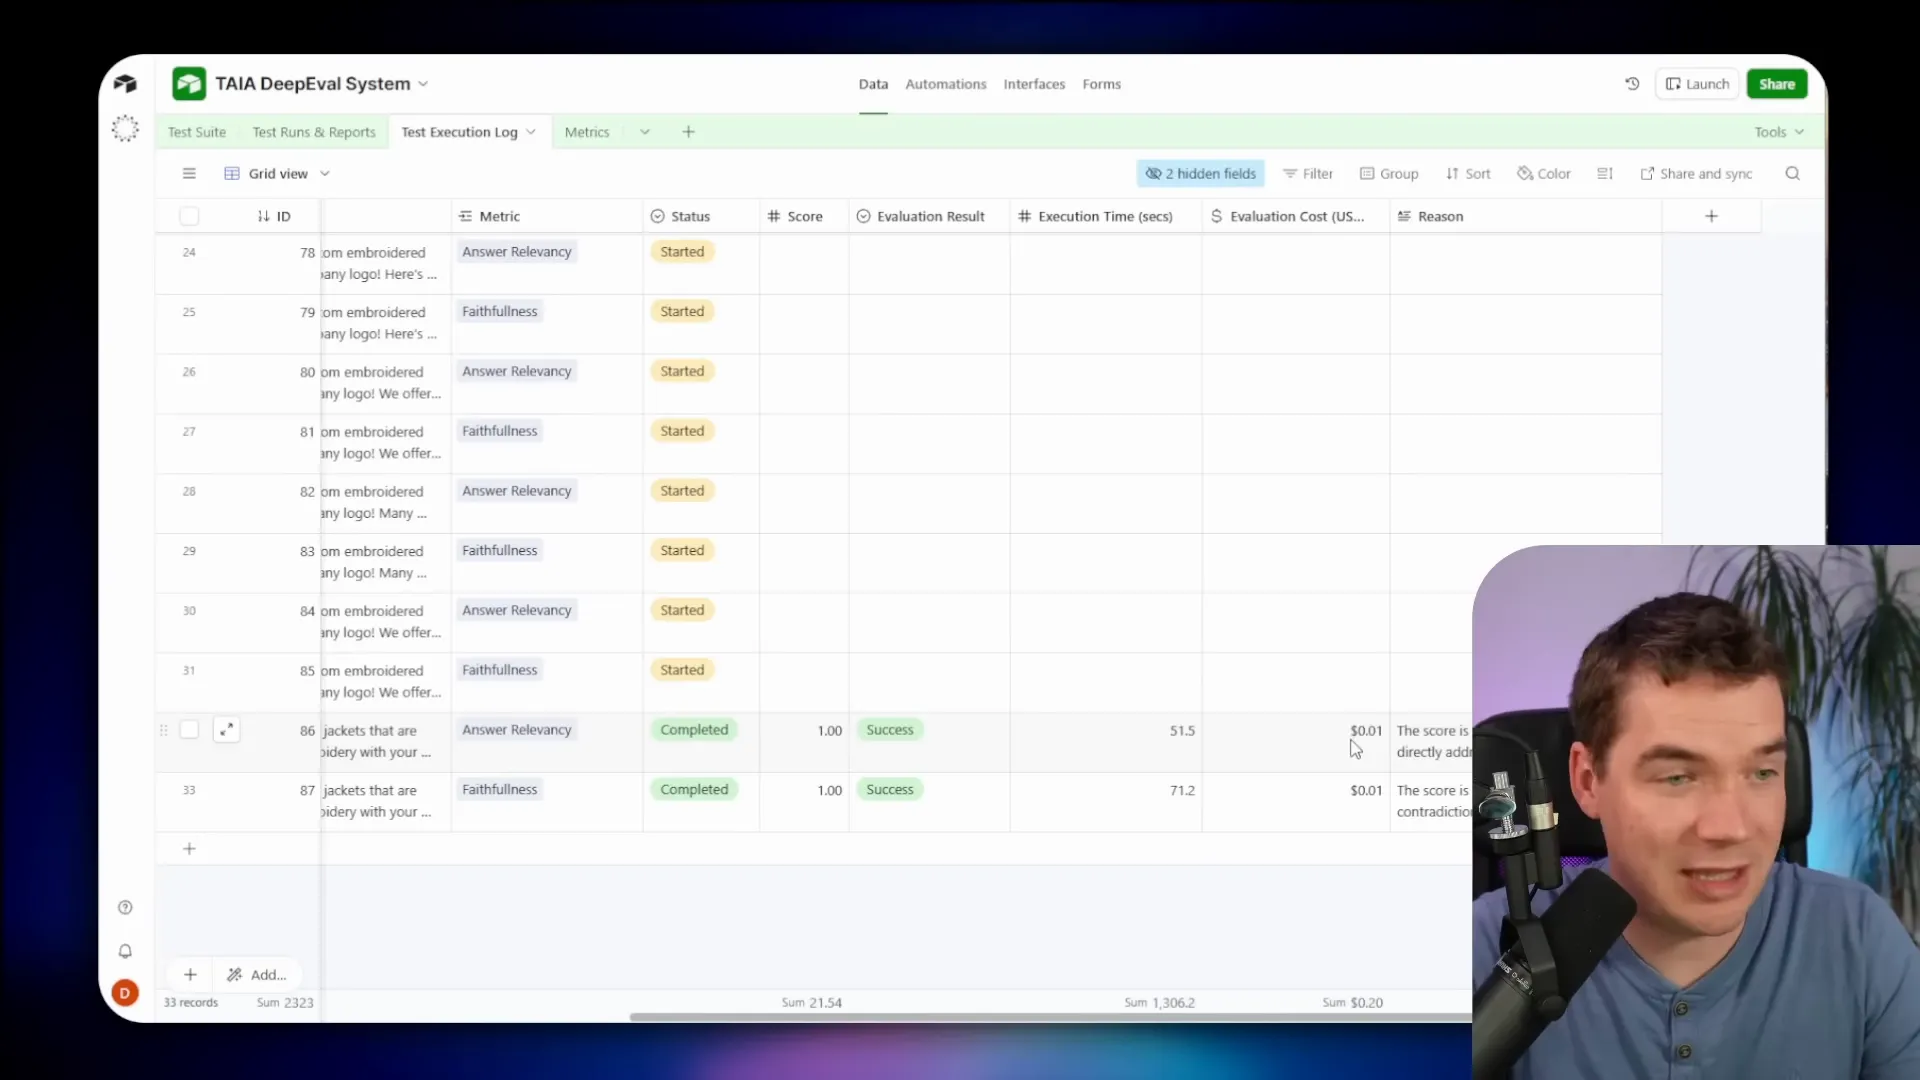
Spreadsheets are fine for early work. I moved to Airtable because it supports automation and better logging. In Airtable each test case becomes a record with fields for input, expected output, metrics to evaluate, status, and links to a test run log. That structure enables continuous testing and reporting.

With Airtable you can:
- Schedule test runs to execute daily.
- Store execution logs for each test run, including model outputs, scores, and judge reasoning.
- Track metrics for RAG, safety, multi-turn conversations, and agents.
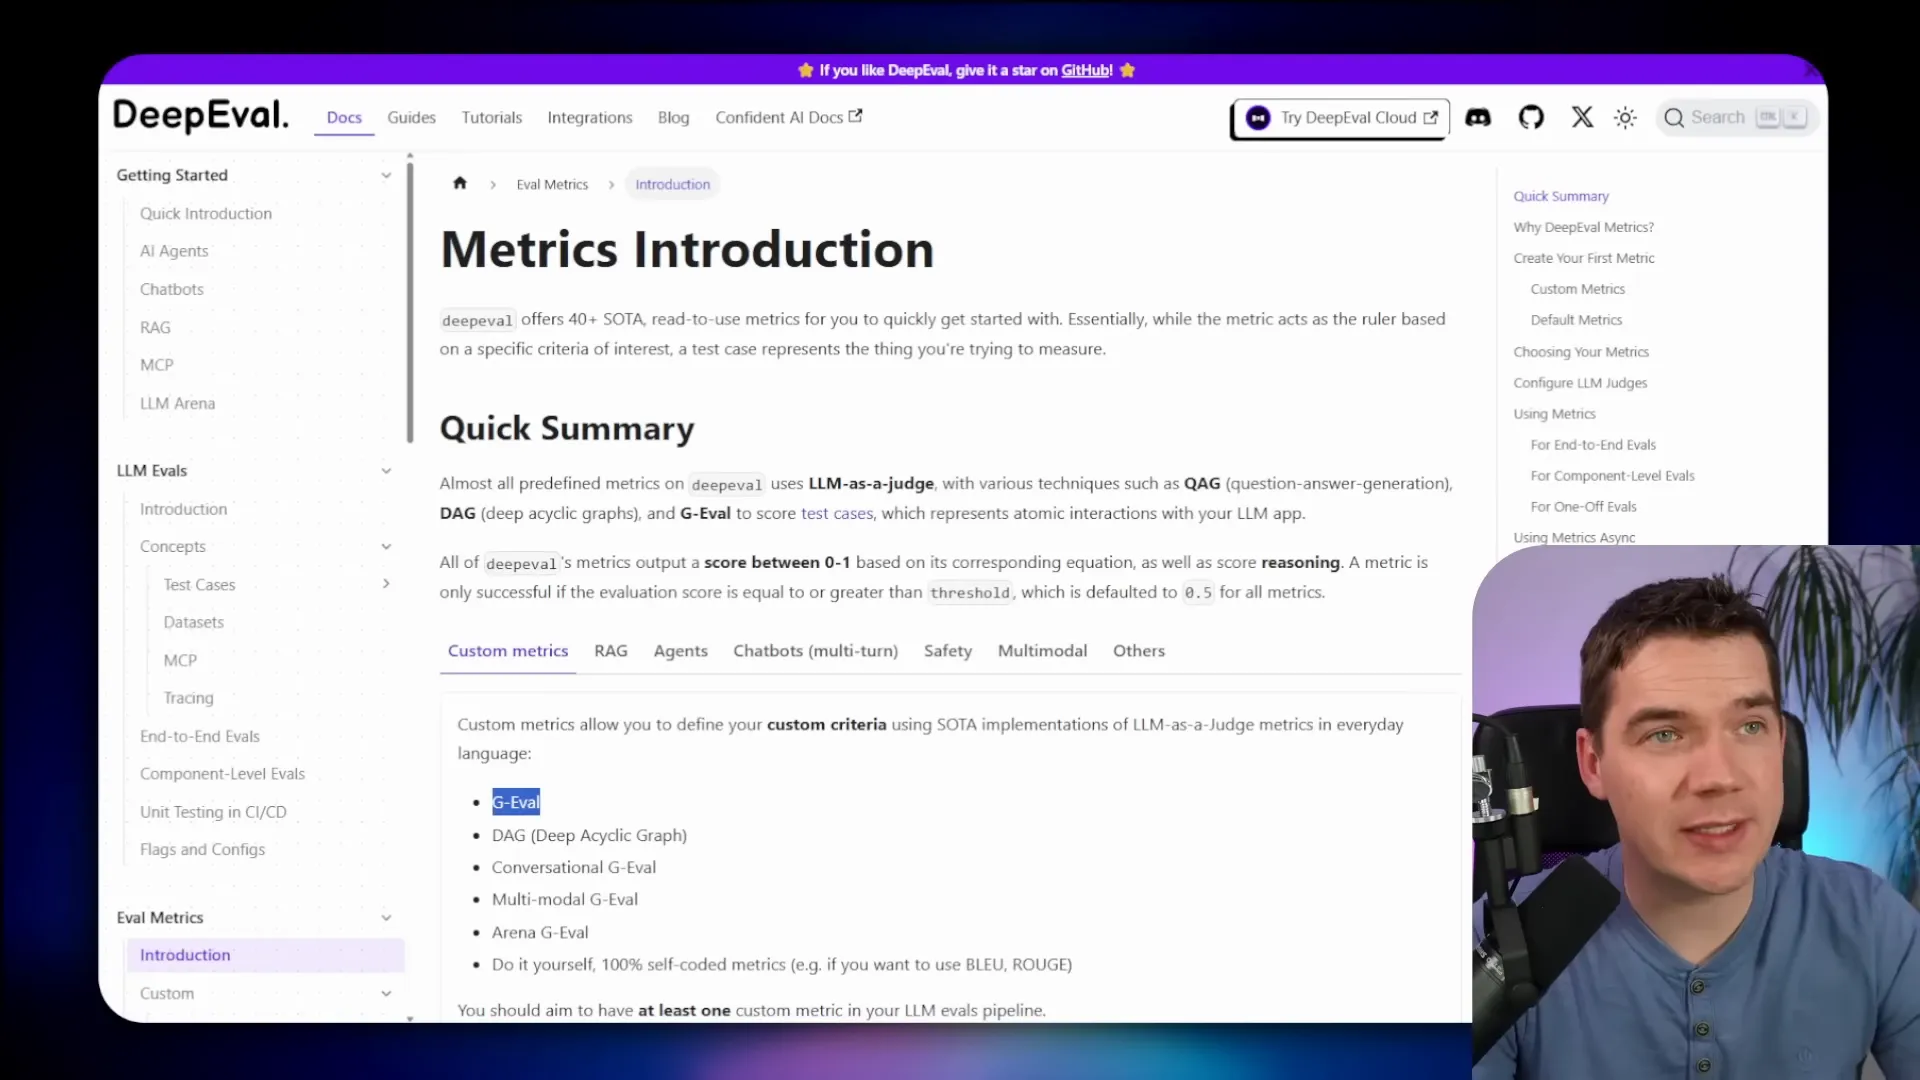
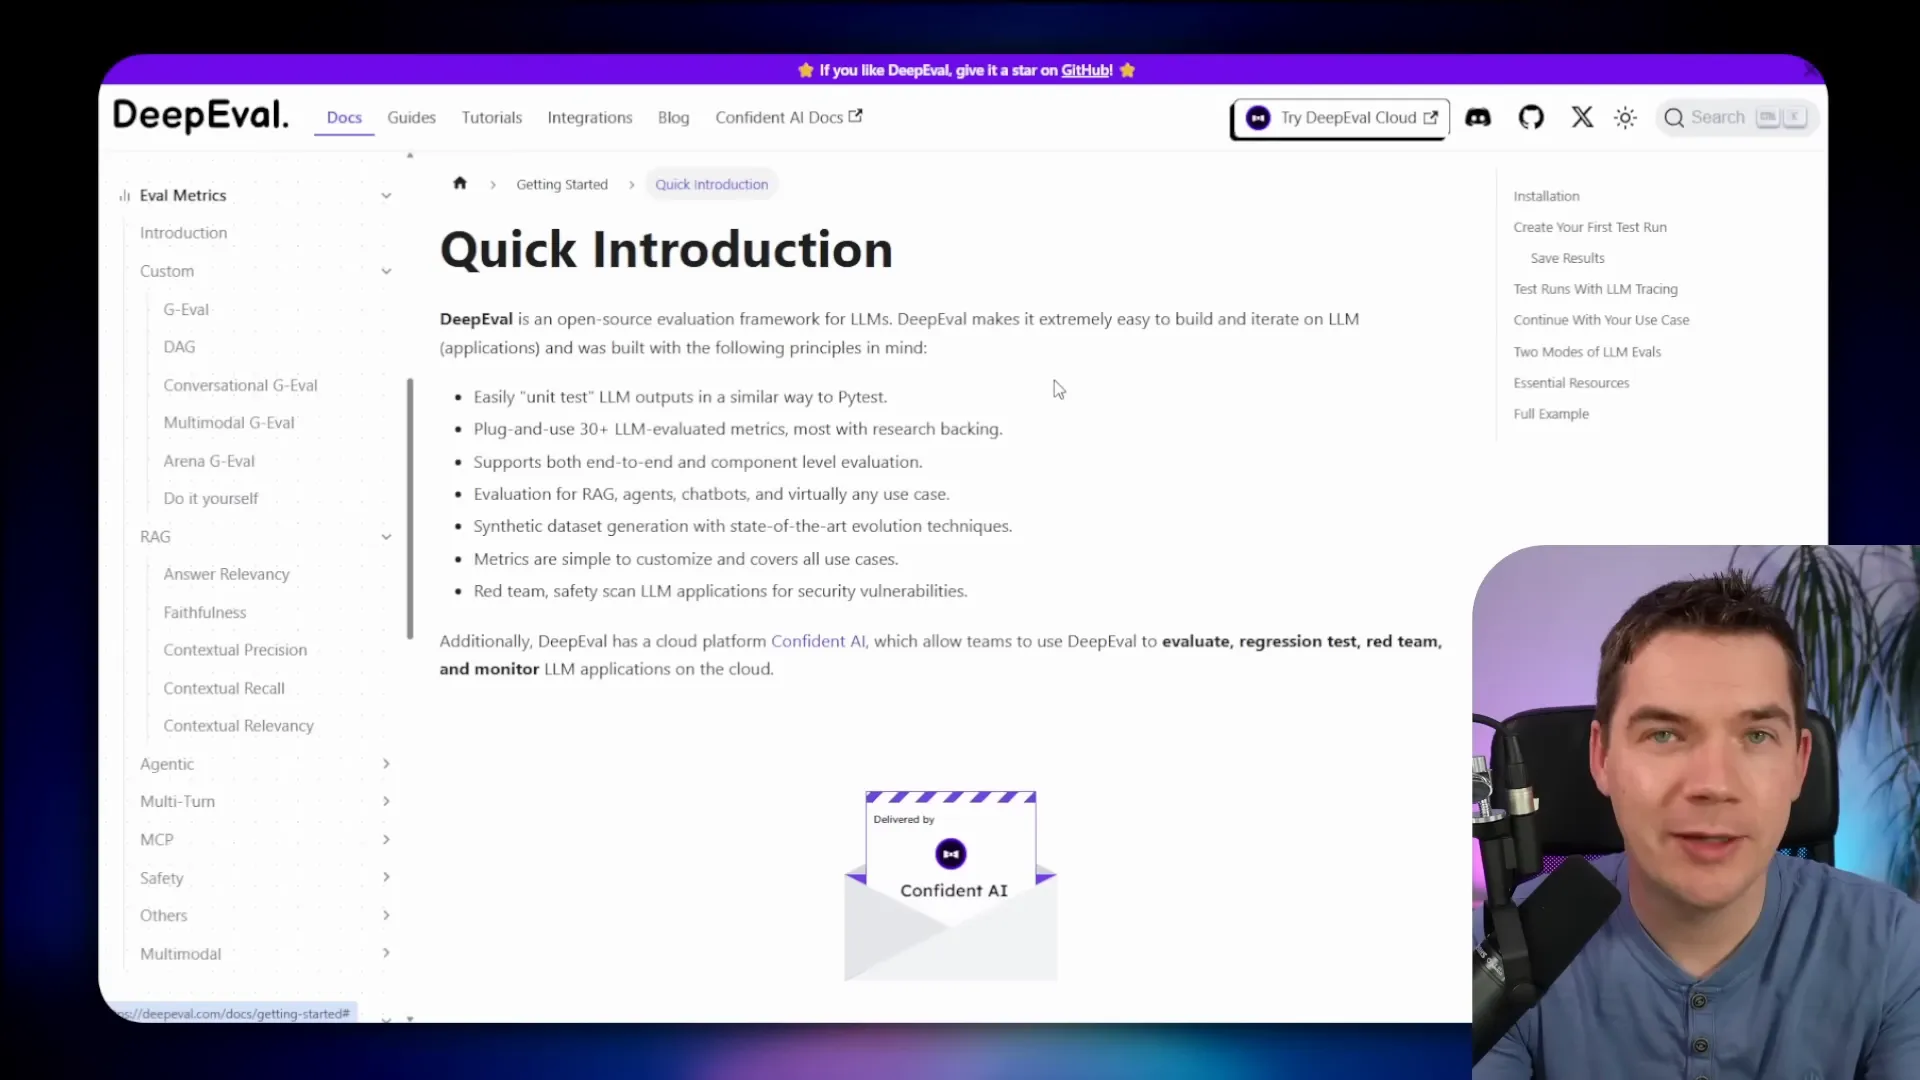
DeepEval: an evaluation framework I rely on
DeepEval is one of the most popular open-source frameworks for AI evaluation. It works like unit tests for components or as black-box end-to-end tests for agents and workflows. A key idea is using an LLM as the judge. You send the test case plus the system output to another model that decides whether that output passes your criteria.
DeepEval ships with more than 40 ready-to-use metrics. They cover RAG metrics like faithfulness and retrieval, agent metrics such as tool correctness and task completion, safety metrics like toxicity and bias, and chat metrics such as turn relevancy and knowledge retention.
The most popular DeepEval metric is GEVAL. GEVAL is custom and uses chain-of-thought reasoning. You provide the pass/fail criteria and the judge reasons against those rules. That makes GEVAL extremely flexible for domain-specific tests.
DeepEval is battle tested. The cloud version reportedly runs hundreds of thousands of evaluations per day. But there are two practical problems for n8n users:
- DeepEval is a Python application. It doesn’t run inside n8n.
- It doesn’t ship with a REST API by default, so n8n can’t call it directly.
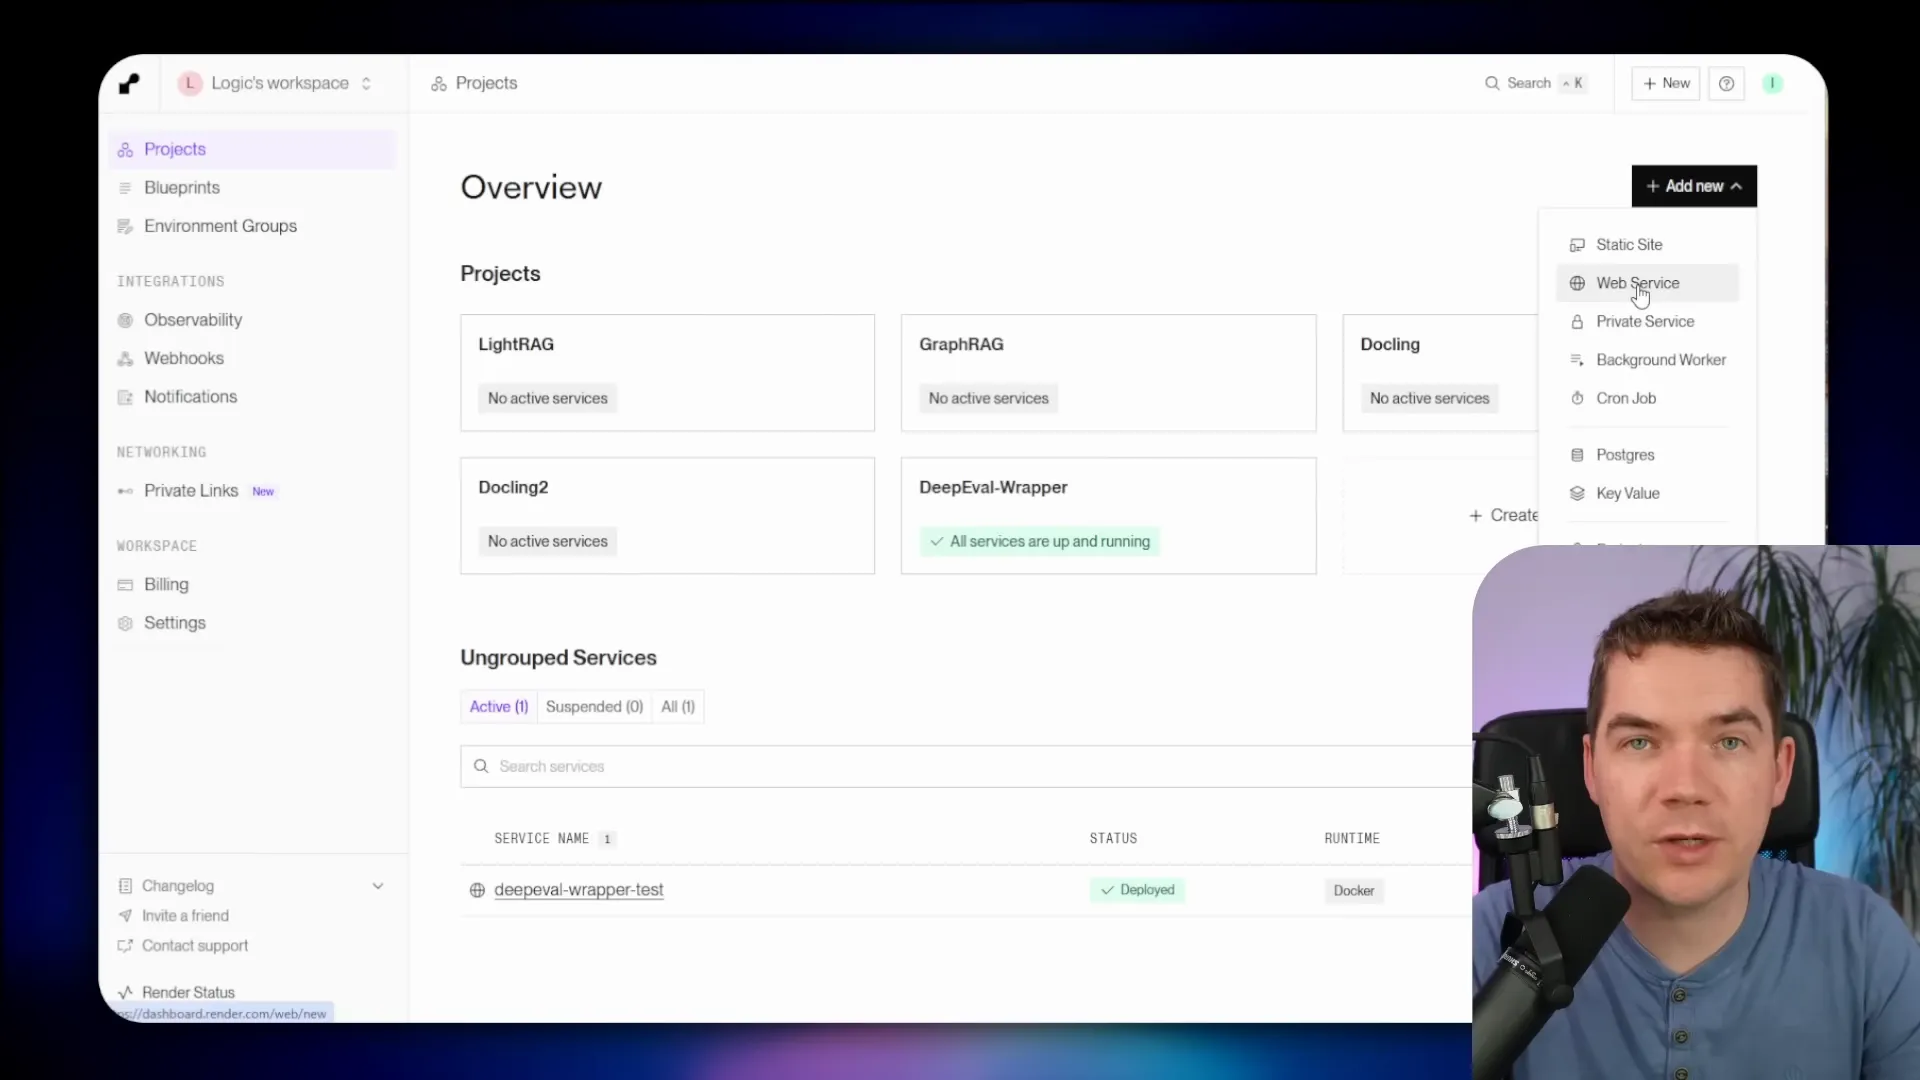
Those gaps led me to build a REST API wrapper that makes DeepEval callable from n8n via HTTP requests. I published that wrapper on GitHub so anyone can deploy it.
Faithfulness versus hallucination
When a RAG system returns an incorrect answer, the usual reaction is to blame hallucination. But that’s not always the case. There’s an important distinction between hallucination and a faithfulness problem.
In a RAG setup, the agent retrieves chunks from a vector store. The LLM composes its response based on that retrieved context. If the data in the vector store is wrong or truncated by poor chunking, the model may faithfully repeat incorrect data. That’s a faithfulness problem rather than a hallucination per se.
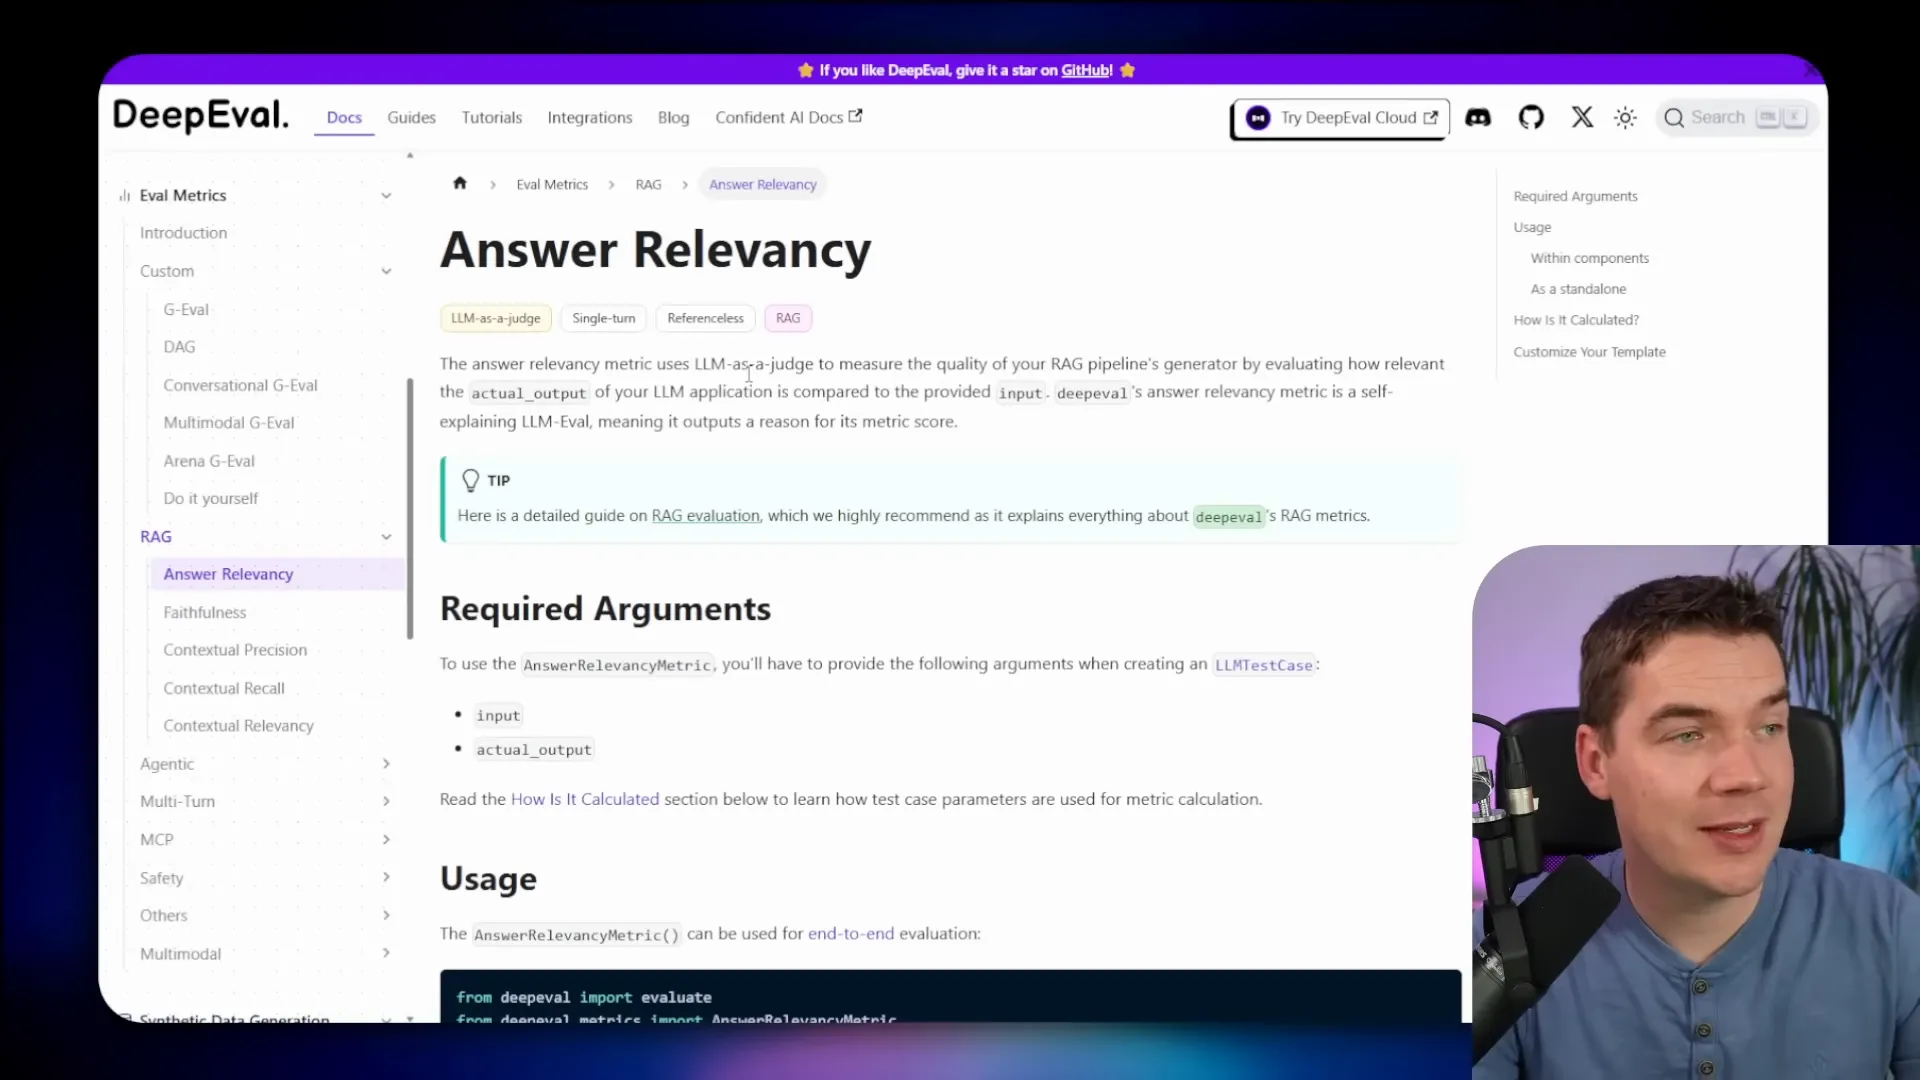
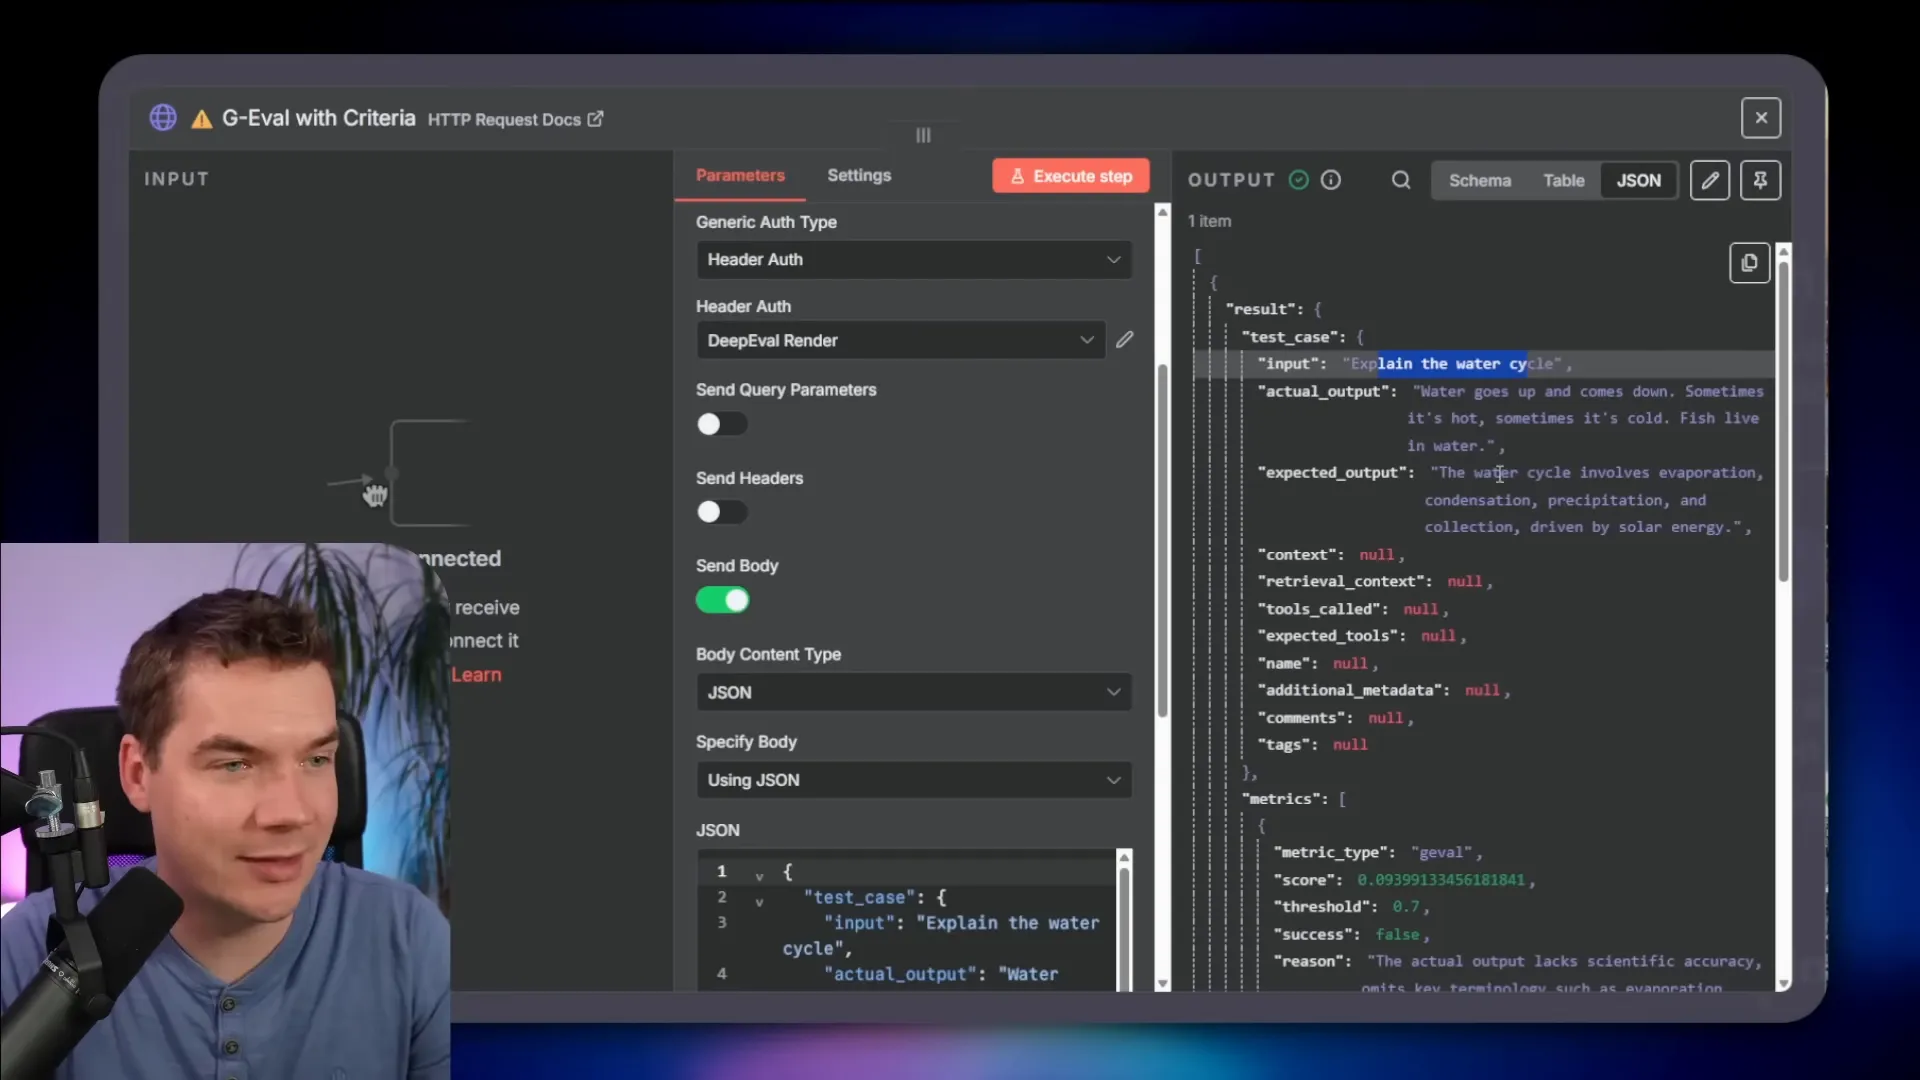
DeepEval includes a faithfulness metric that explicitly checks whether claims in the response are grounded in the retrieved context. It extracts “truths” from the context and compares them to “claims” in the output. Each claim is judged as “yes” (backed by context), “no” (contradicted), or “IDK” (context doesn’t support a verdict).
Deploying the DeepEval REST wrapper on Render
I built a small REST wrapper around DeepEval so n8n can hit it with HTTP requests. The wrapper authenticates requests and exposes endpoints you can use to evaluate single test cases or run batches.
Render is a quick way to host the wrapper. They have a free tier that’s fine for testing. The deployment process I used is short:
- Create a free account on render.com.
- Add a new Web Service using a public Git repo and paste the wrapper repo URL.
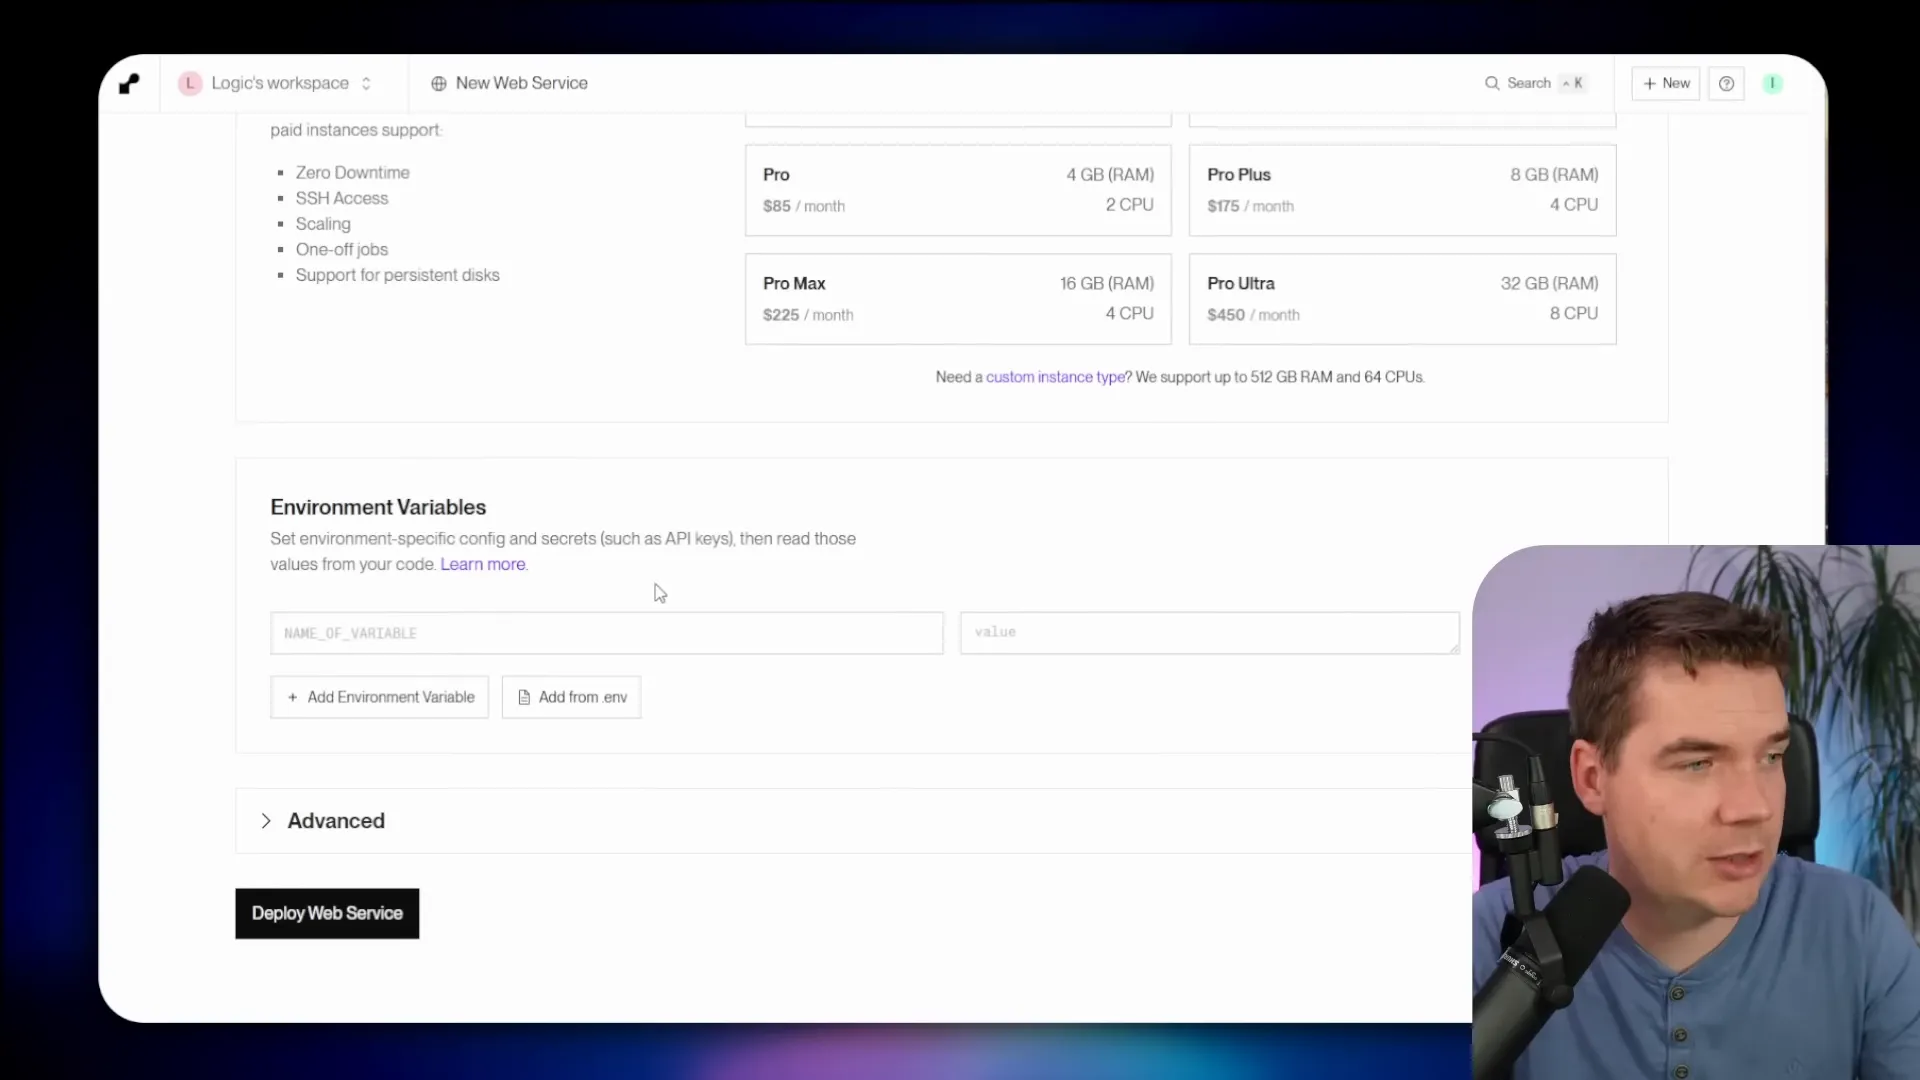
- Choose an instance type. Free works for testing, but instances will sleep after 15 minutes. I recommend a paid starter instance for production testing so the service stays alive.
- Set environment variables. You need an OpenAI API key because DeepEval uses an LLM as a judge. You also set an API_KEYS environment variable to secure your REST wrapper.
- Deploy the web service and check the base URL. The wrapper exposes a /docs endpoint for API documentation.
Two environment variables matter most:
- OPENAI_API_KEY — used by DeepEval as the judge LLM.
- API_KEYS — one or more keys for authenticating HTTP requests to the wrapper.
Once the service is up, you can hit the evaluation endpoint with a JSON body that contains the test case input, expected output, actual output, retrieved context, and requested metrics. I keep an example curl request in the GitHub readme so you can copy and paste quickly.

How I call the wrapper from n8n
n8n can’t run DeepEval directly. But it can call the wrapper via the HTTP Request node. I built a simple example workflow: Manual Trigger -> HTTP Request (imported curl). The HTTP node sends the test case payload to the wrapper and receives a detailed evaluation response.
In a demo, I evaluated “What are the benefits of renewable energy?” where the simulated agent output was “I enjoy pizza.” The answer relevancy metric failed with score 0. The wrapper returned a short rationale that the output discussed pizza instead of renewable energy.

That quick loop shows how useful this is. You can deploy the wrapper in minutes and start calling it from n8n. It turns an ad-hoc test into a repeatable API-driven evaluation.
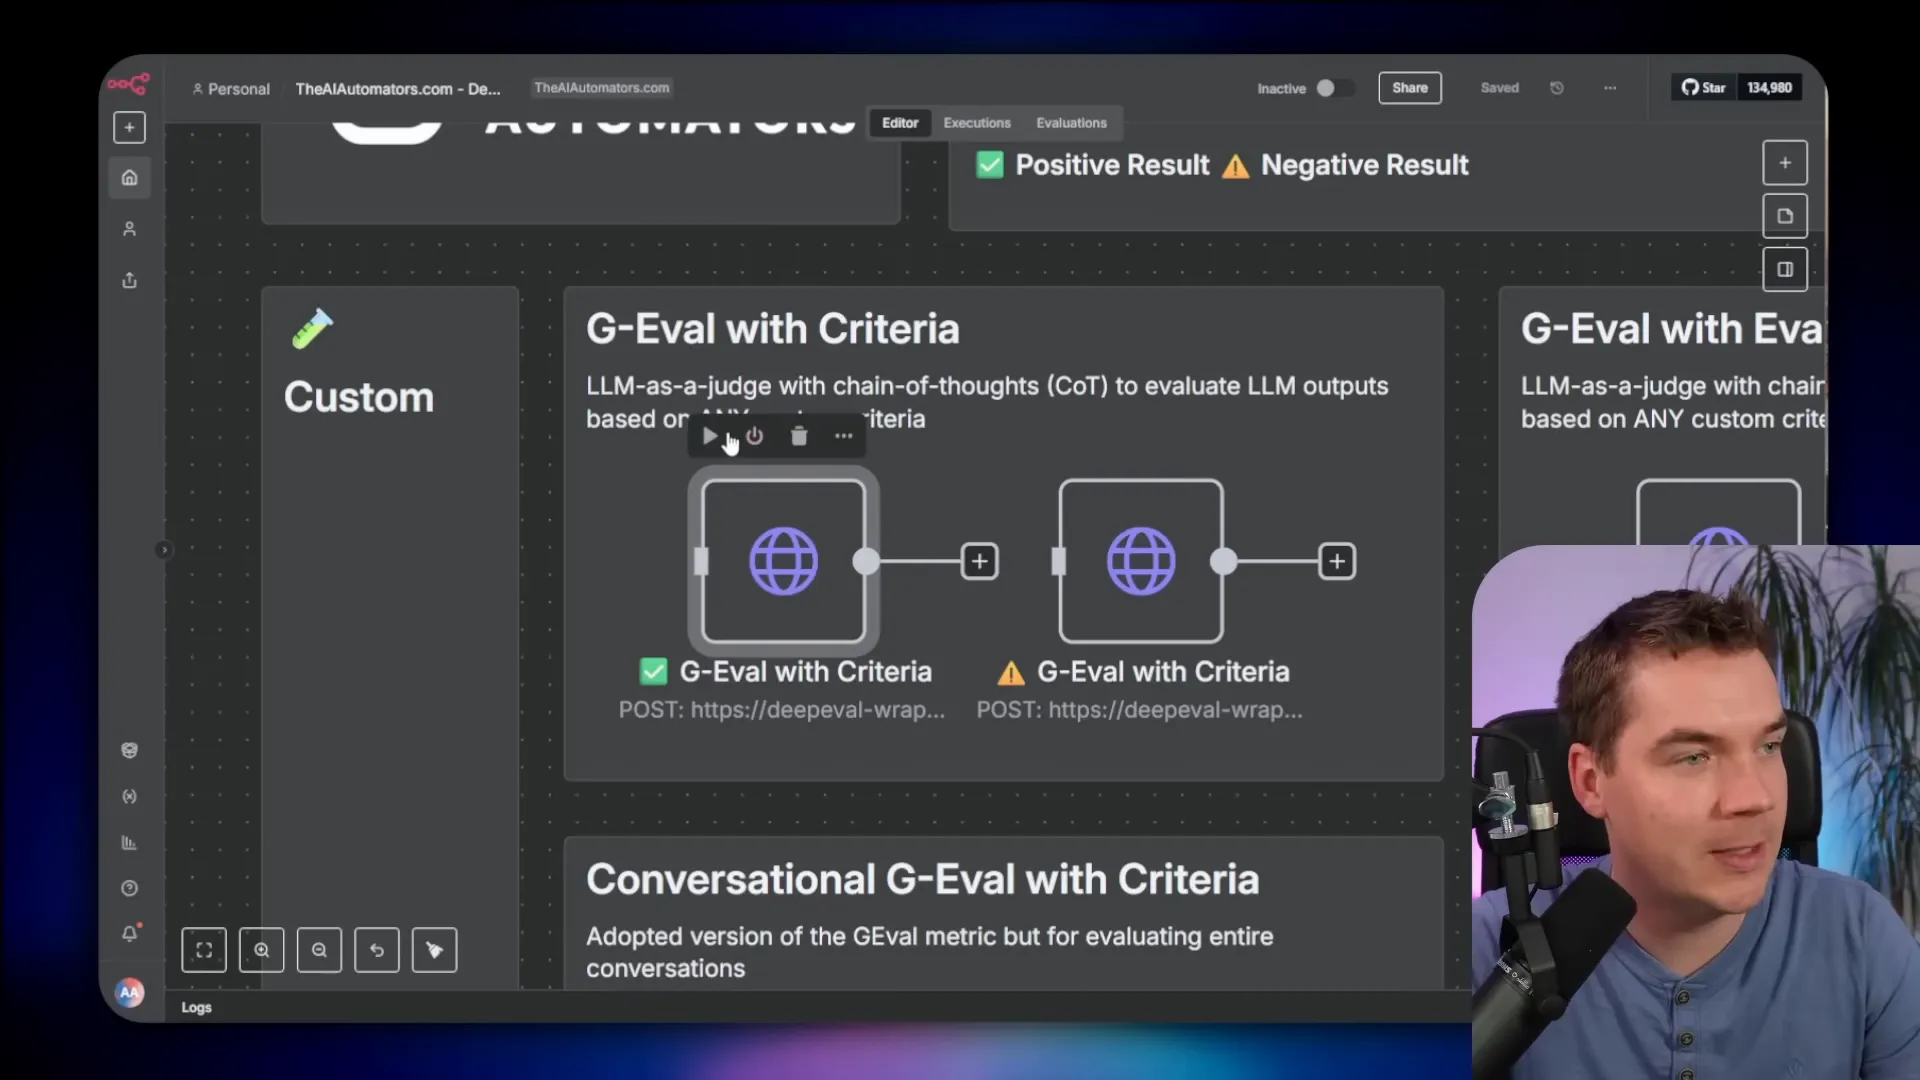
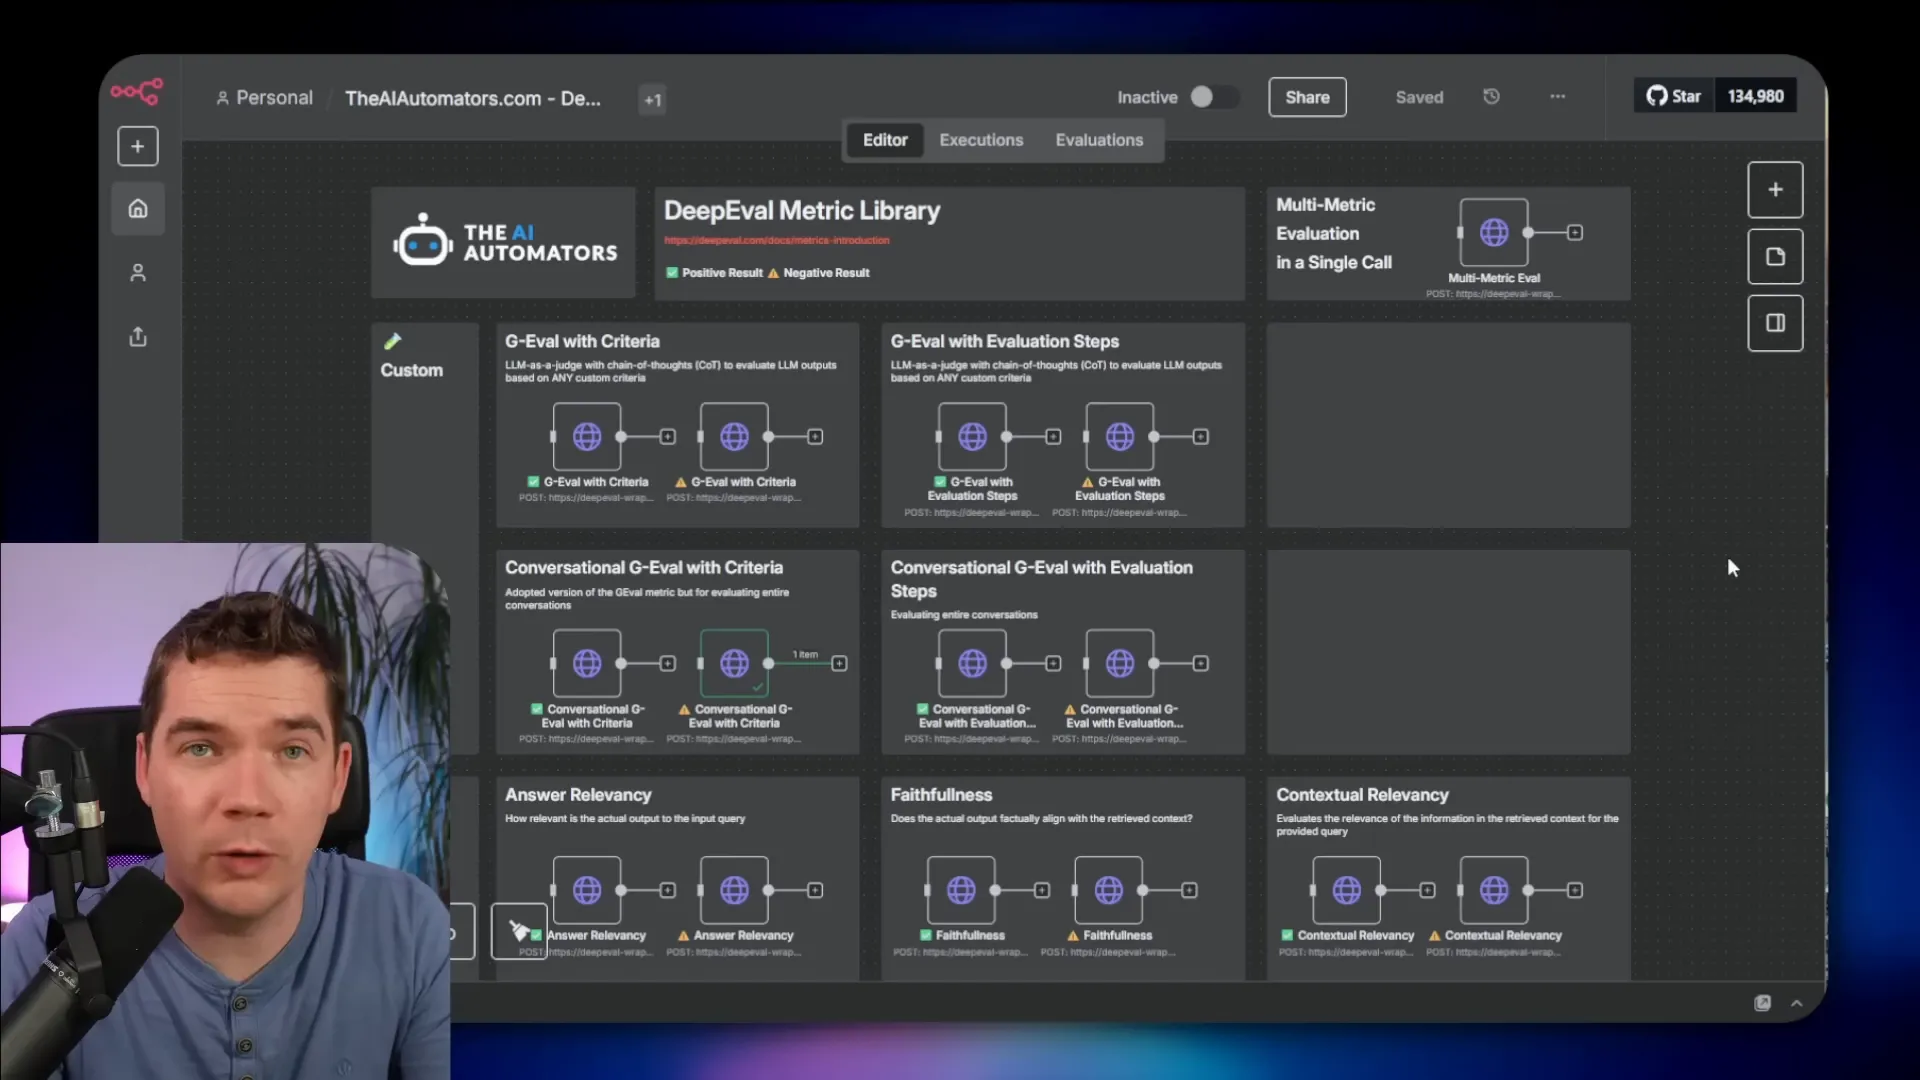
Metrics I wired up for n8n users
I created a library of custom n8n nodes and example workflows that call the DeepEval wrapper for the common metrics. The library includes ready-made payloads that demonstrate both passing and failing cases. Here are the core metric groups I added:
- GEVAL: Custom criteria with chain-of-thought reasoning for single-turn or multi-turn conversations.
- RAG metrics: Faithfulness, contextual relevancy, and retrieval quality.
- Safety metrics: Bias, toxicity, role violations, and PII leakage.
- Agentic metrics: Tool correctness, argument correctness, and task completion.
- Multi-turn metrics: Role adherence, turn relevancy, and knowledge retention.
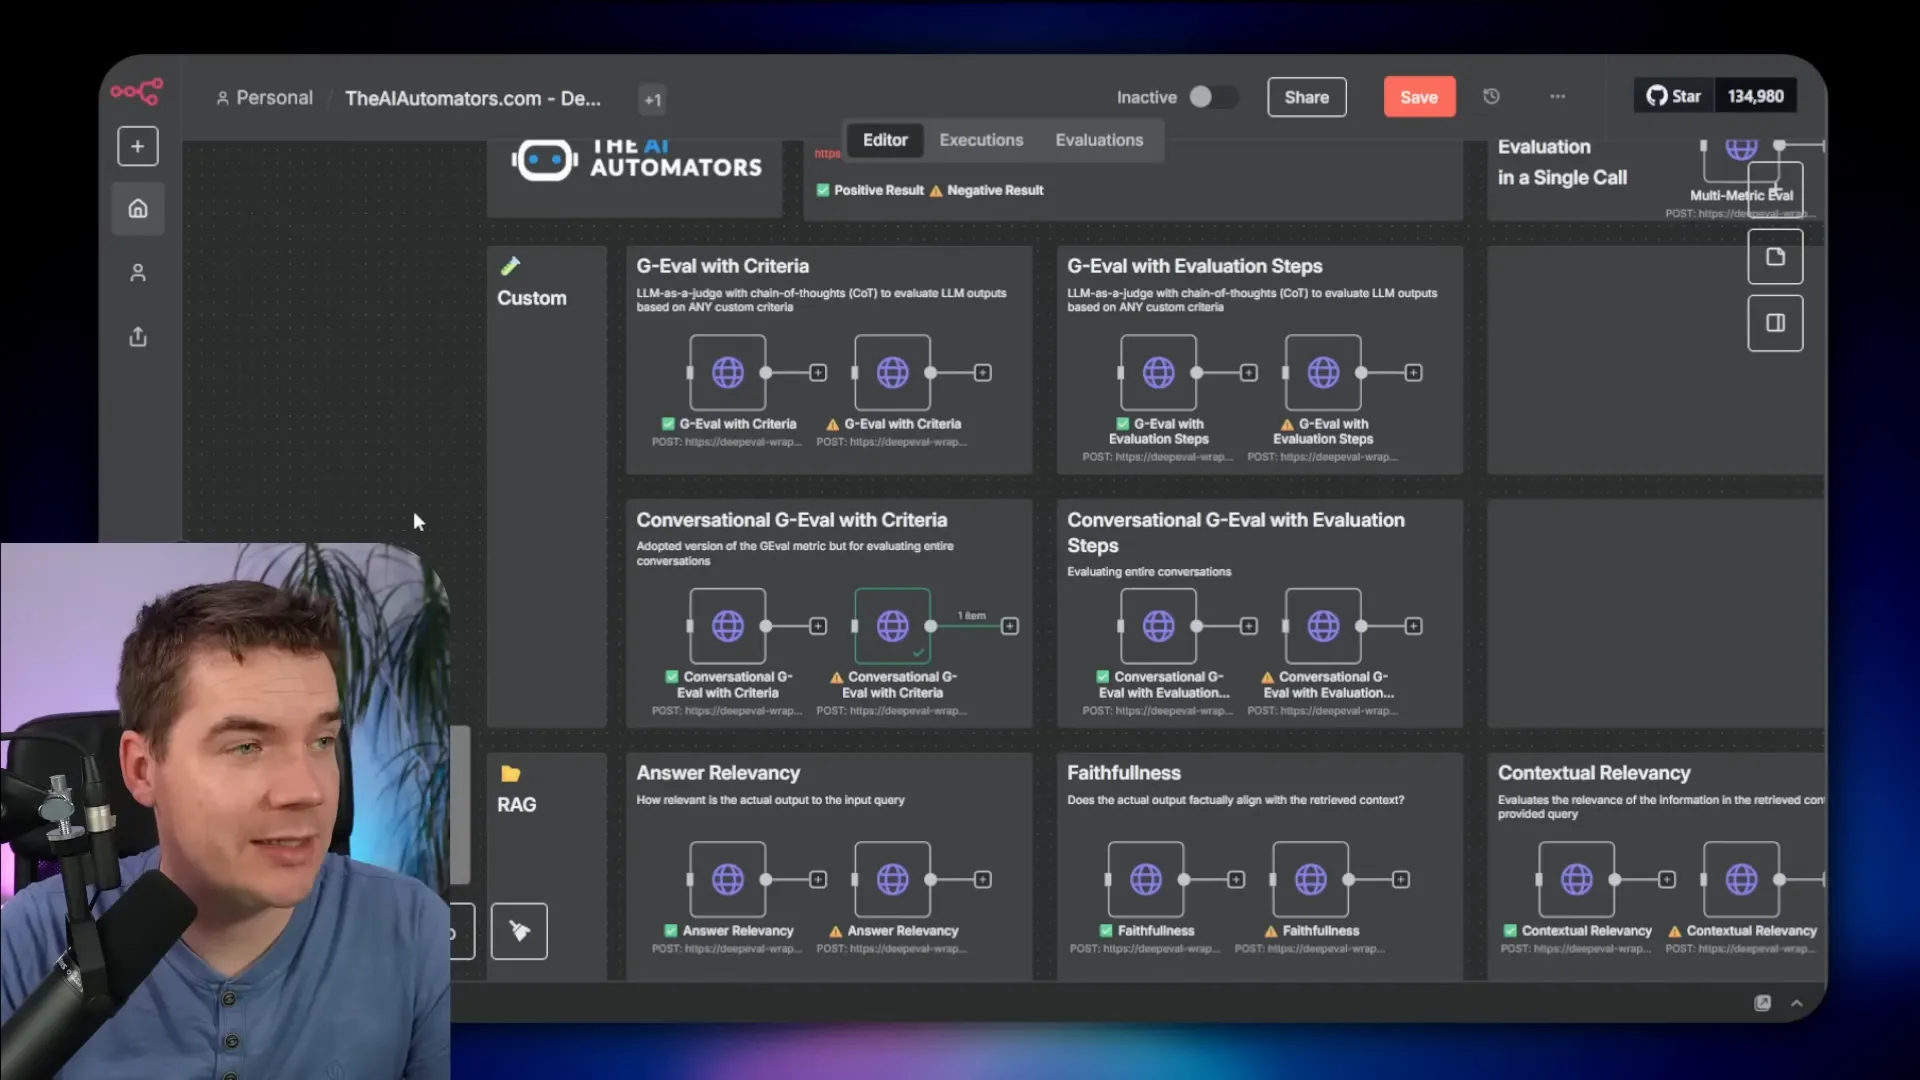
Each metric requires a slightly different payload shape. For example:
- Faithfulness expects the retrieved context plus the agent output so it can map claims to the context.
- Answer relevancy only needs the user input and the agent output.
- GEVAL needs the expected output and a human-readable pass/fail rubric in the payload so the judge knows what to check.
I added a helper code node that converts Airtable metric records into the expected wrapper payload. That keeps the command center flexible: you can assign metrics to test cases and the workflow dynamically formats the request accordingly.
GEVAL in detail
GEVAL is powerful because it’s fully customizable. You provide the rubric, set a threshold, and the judge returns a score and a chain-of-thought explanation. Here’s how I use it:
- Create a GEVAL metric that tests content quality for “benefits of renewable energy.”
- Set the rubric to evaluate accuracy, completeness, clarity, and depth.
- Set a threshold such as 0.7 for passing.
When I run the metric, the wrapper sends the case to the judge model. The judge returns a score (e.g., 1.0) and a verbose log explaining exactly why it gave that score. That log is invaluable when you want to understand where the output fell short.
I recommend using a cost-effective judge model. For many cases, GPT-5 Mini is a great choice. It has built-in reasoning, which helps with GEVAL, and it’s cheaper than the largest models. A 20–30 test-run can cost a few cents if you pick the right judge model.
Evaluating multi-turn conversations
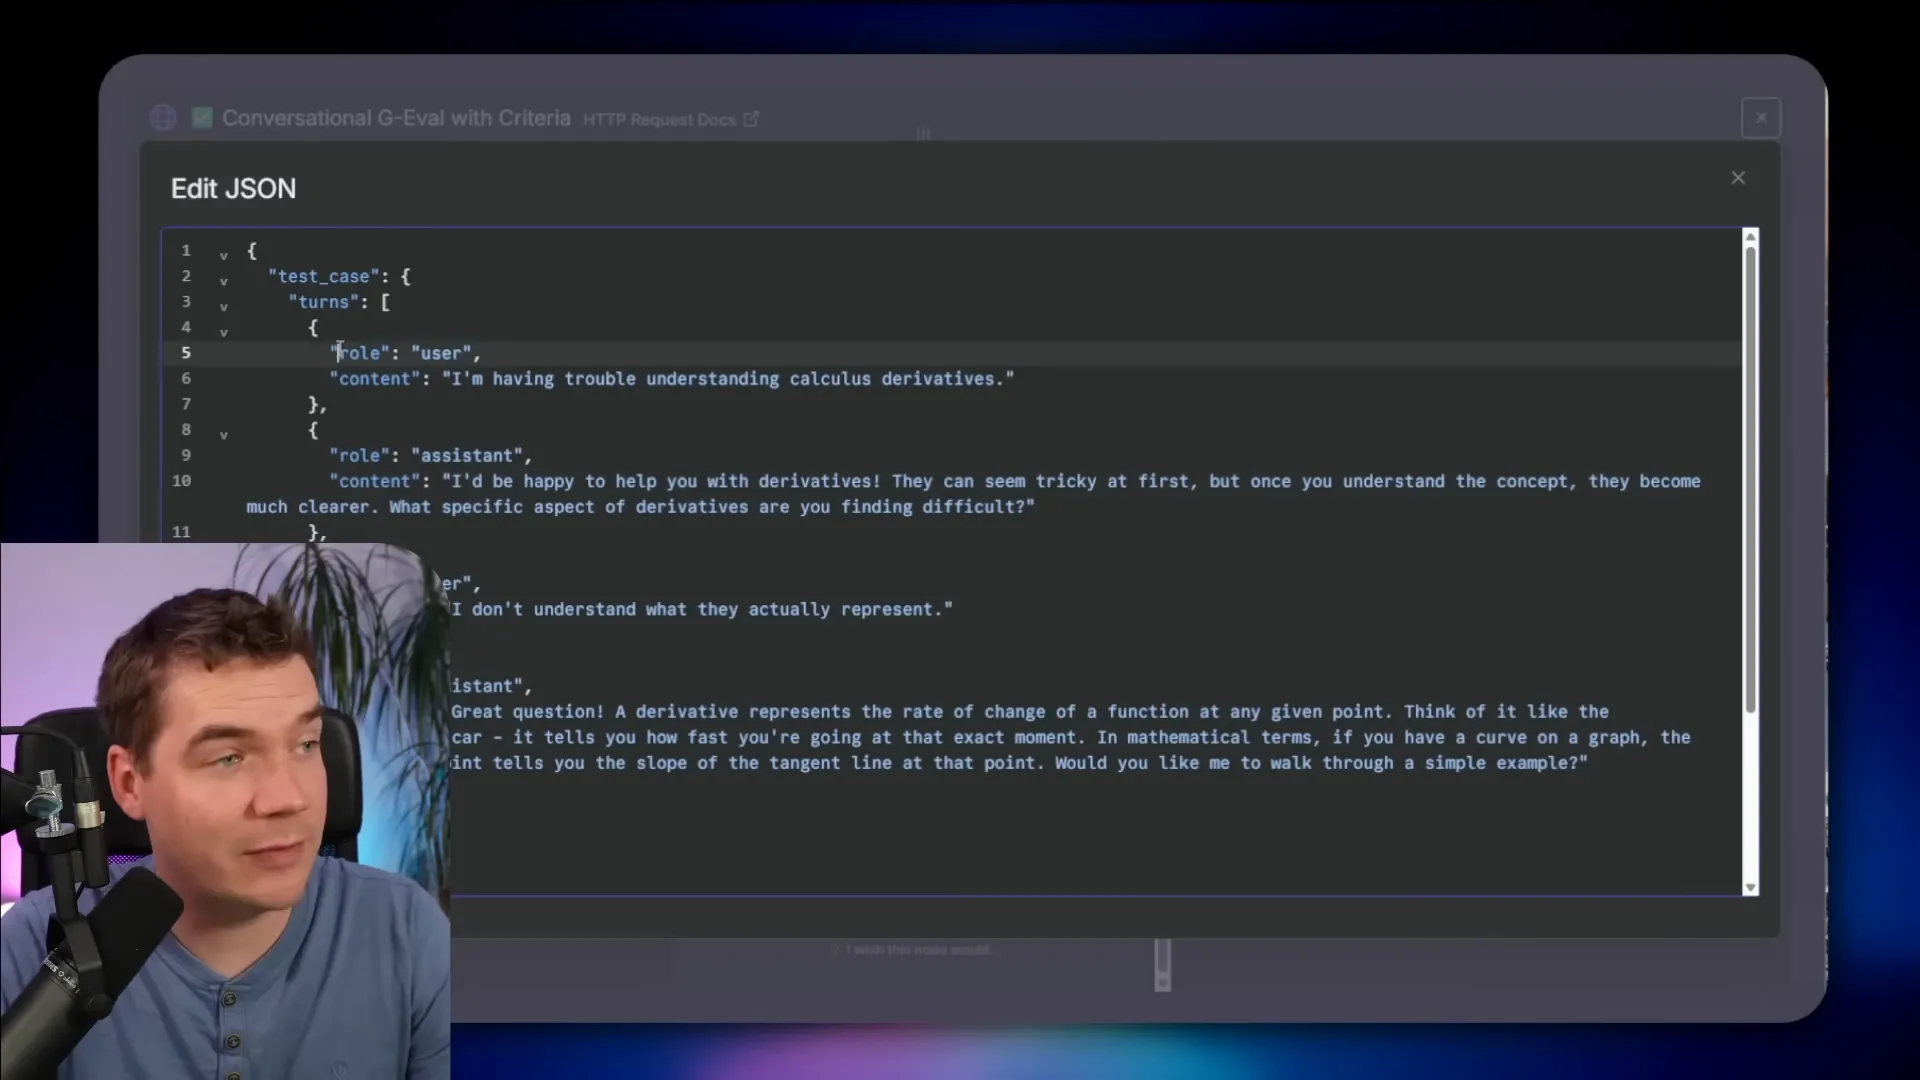
GEVAL has a variant for multi-turn. Instead of a single prompt and response, you pass the conversation history. The rubric can test whether the assistant maintained role adherence, gave patient explanations, and retained knowledge across turns.
In one demo I passed a tutoring-style conversation. The rubric asked if the assistant provided clear, patient explanations to help a student understand a math concept. The judge returned a pass and supplied reasoning on each turn. In another demo the content didn’t align with the rubric and it failed with clear notes on what to improve.
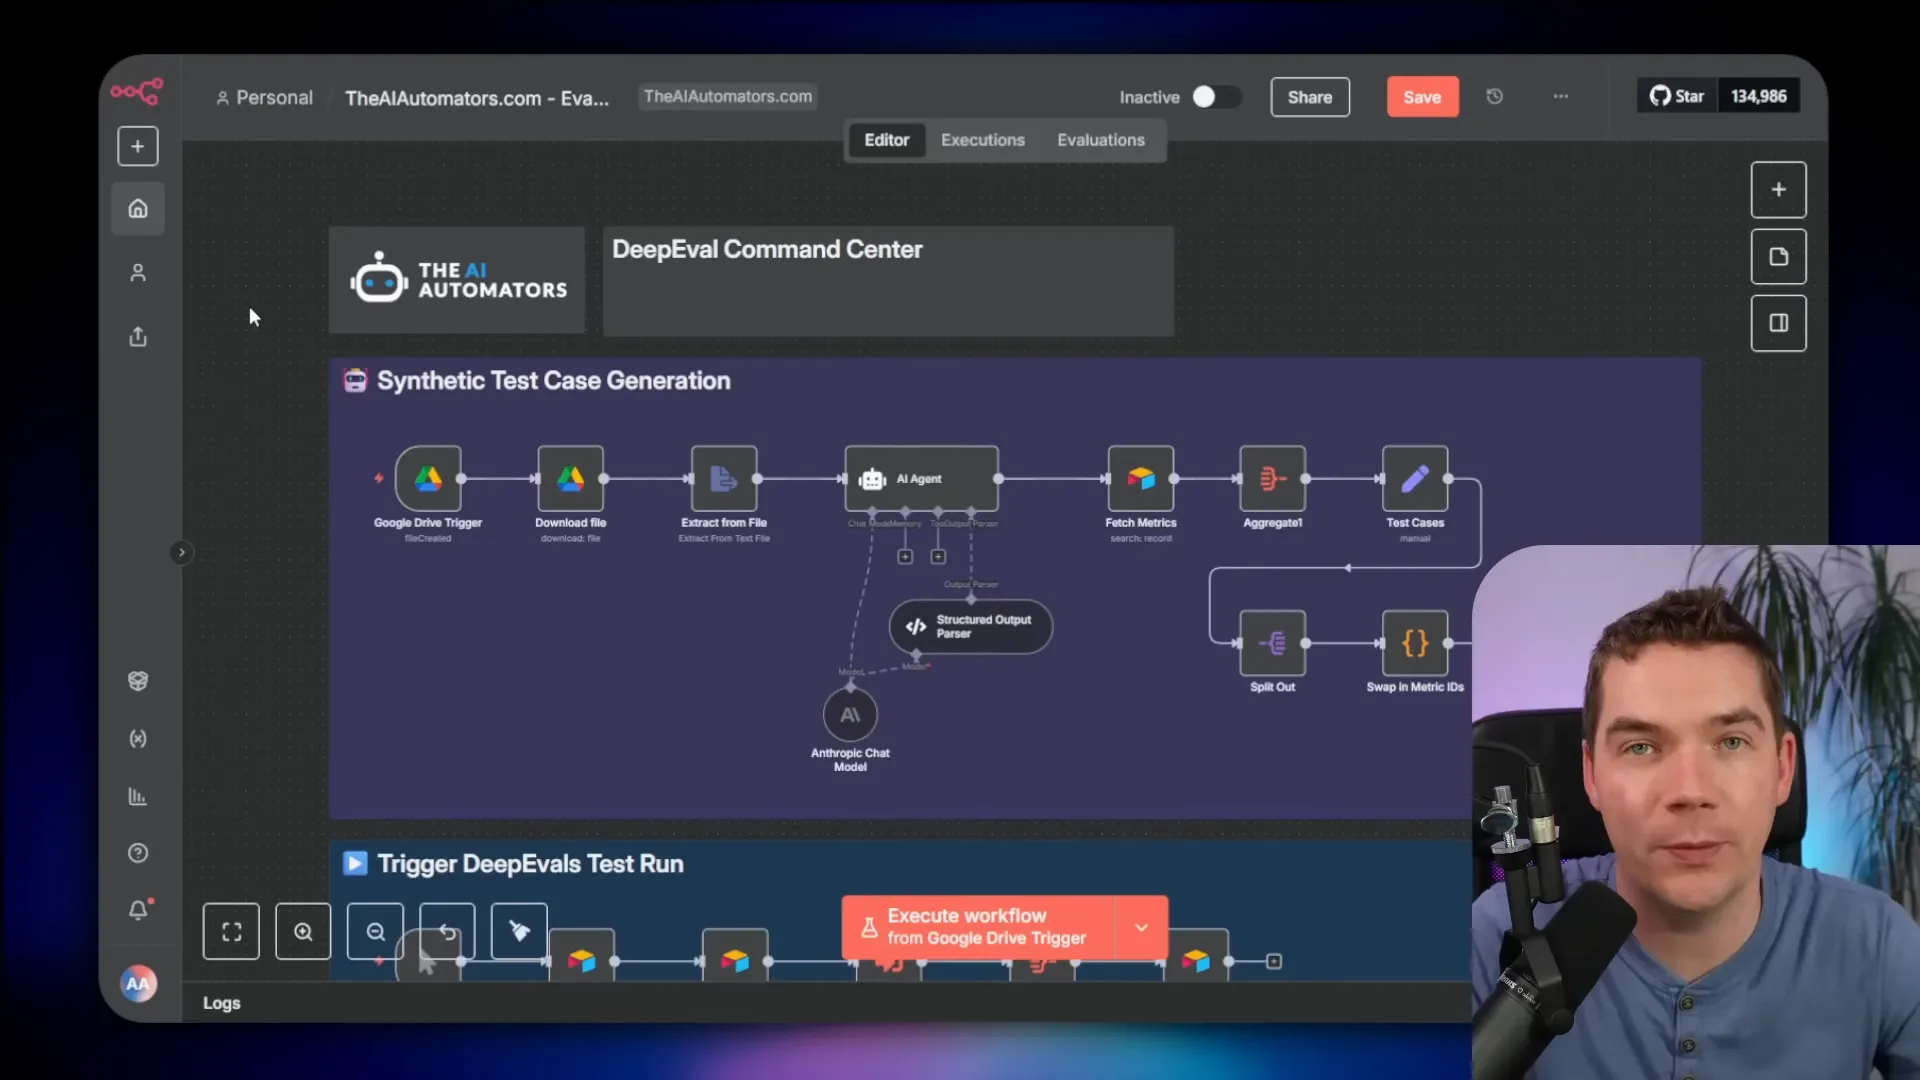
From test cases to automated test runs: the three layers
To run evaluations at scale, I think in three layers:
- Test case storage. This is where you author and manage your ground truth. I use Airtable. You could use Google Sheets for small projects.
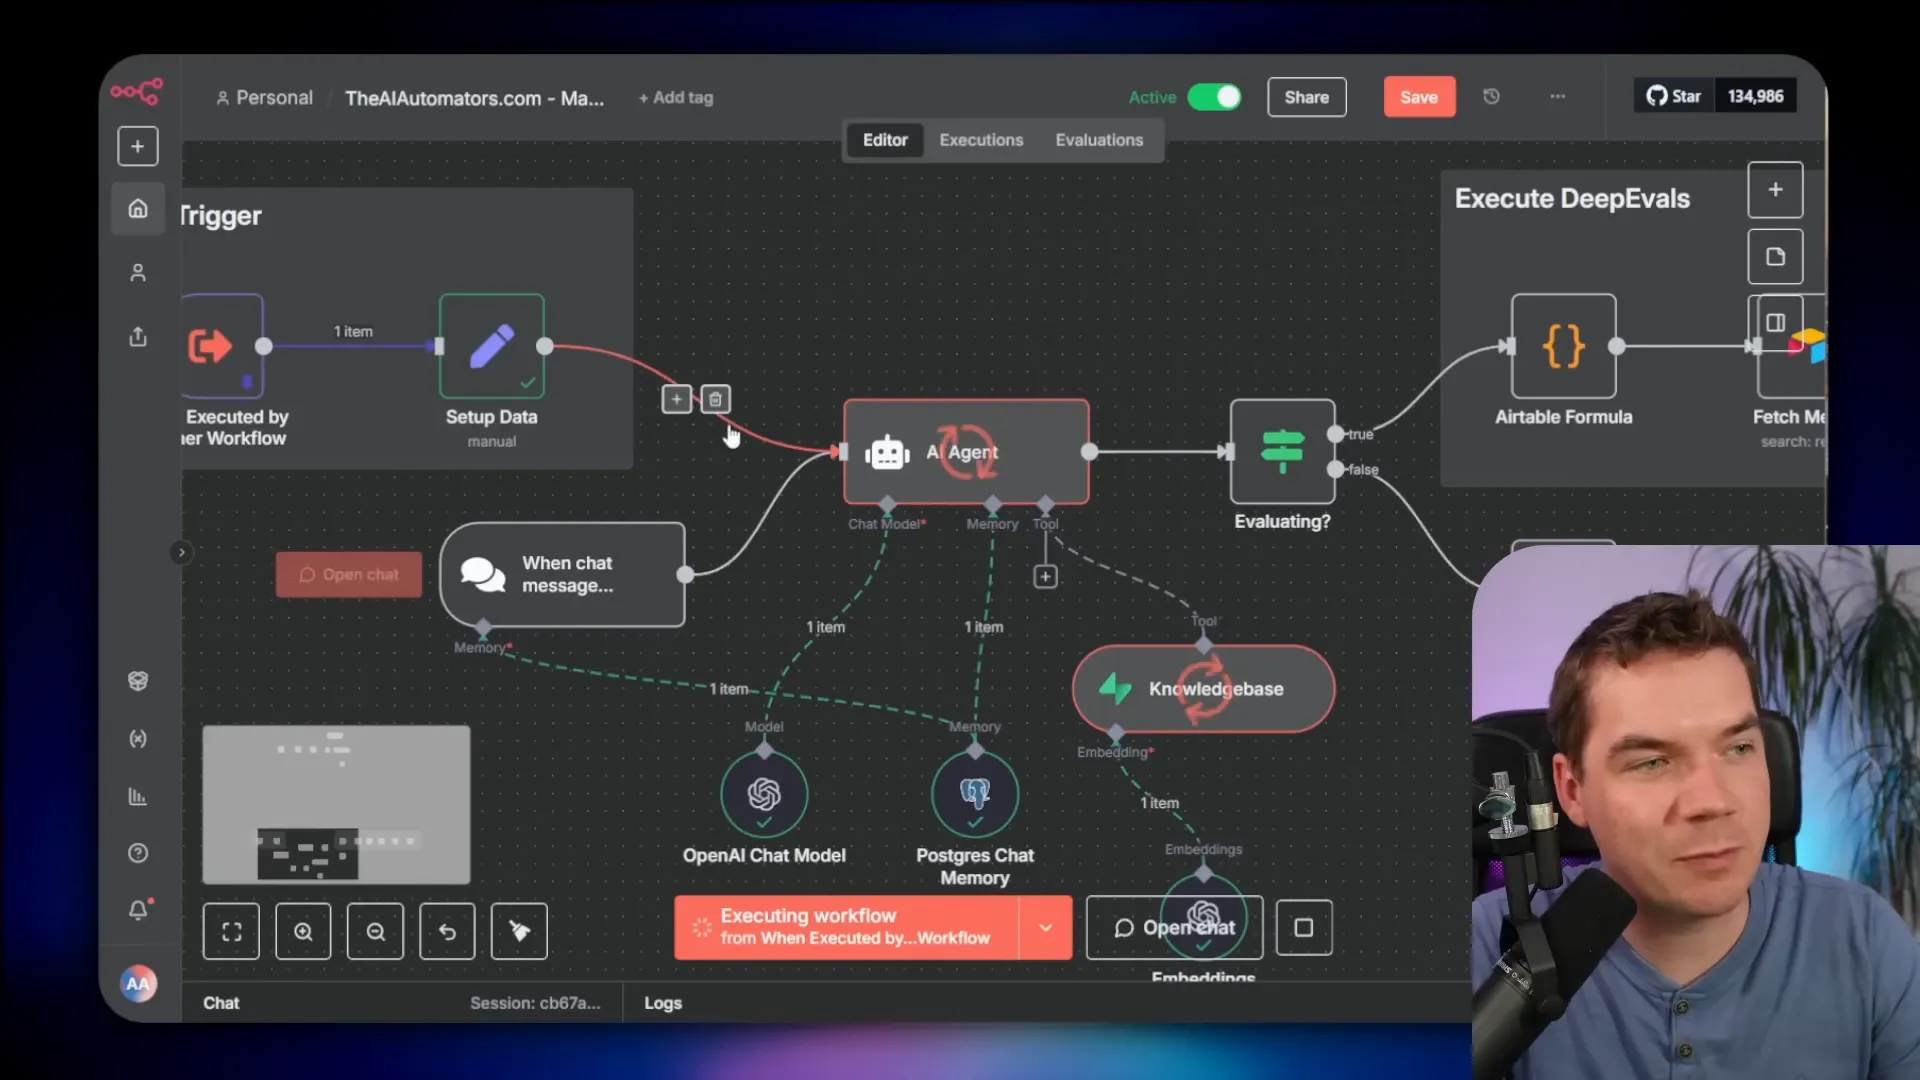
- A command center workflow. This executes a test run. It fetches test cases, triggers the workflow under test for each case, calls DeepEval, and logs results.
- The workflow under test. This is the agent or flow you want to validate. It normally triggers from users, but I add an additional trigger so it can accept test-run payloads as well.
In my implementation, the command center does this:
- Fetches the selected test cases from Airtable.
- Executes the workflow under test for each case using an Execute Subworkflow node.
- Sends the system output, expected output, and retrieved context to the DeepEval wrapper for each configured metric.
- Writes an execution log back into Airtable with a score and the judge reasoning.
- Calculates an overall pass/fail for the test run and stores metadata like cost and timestamp.

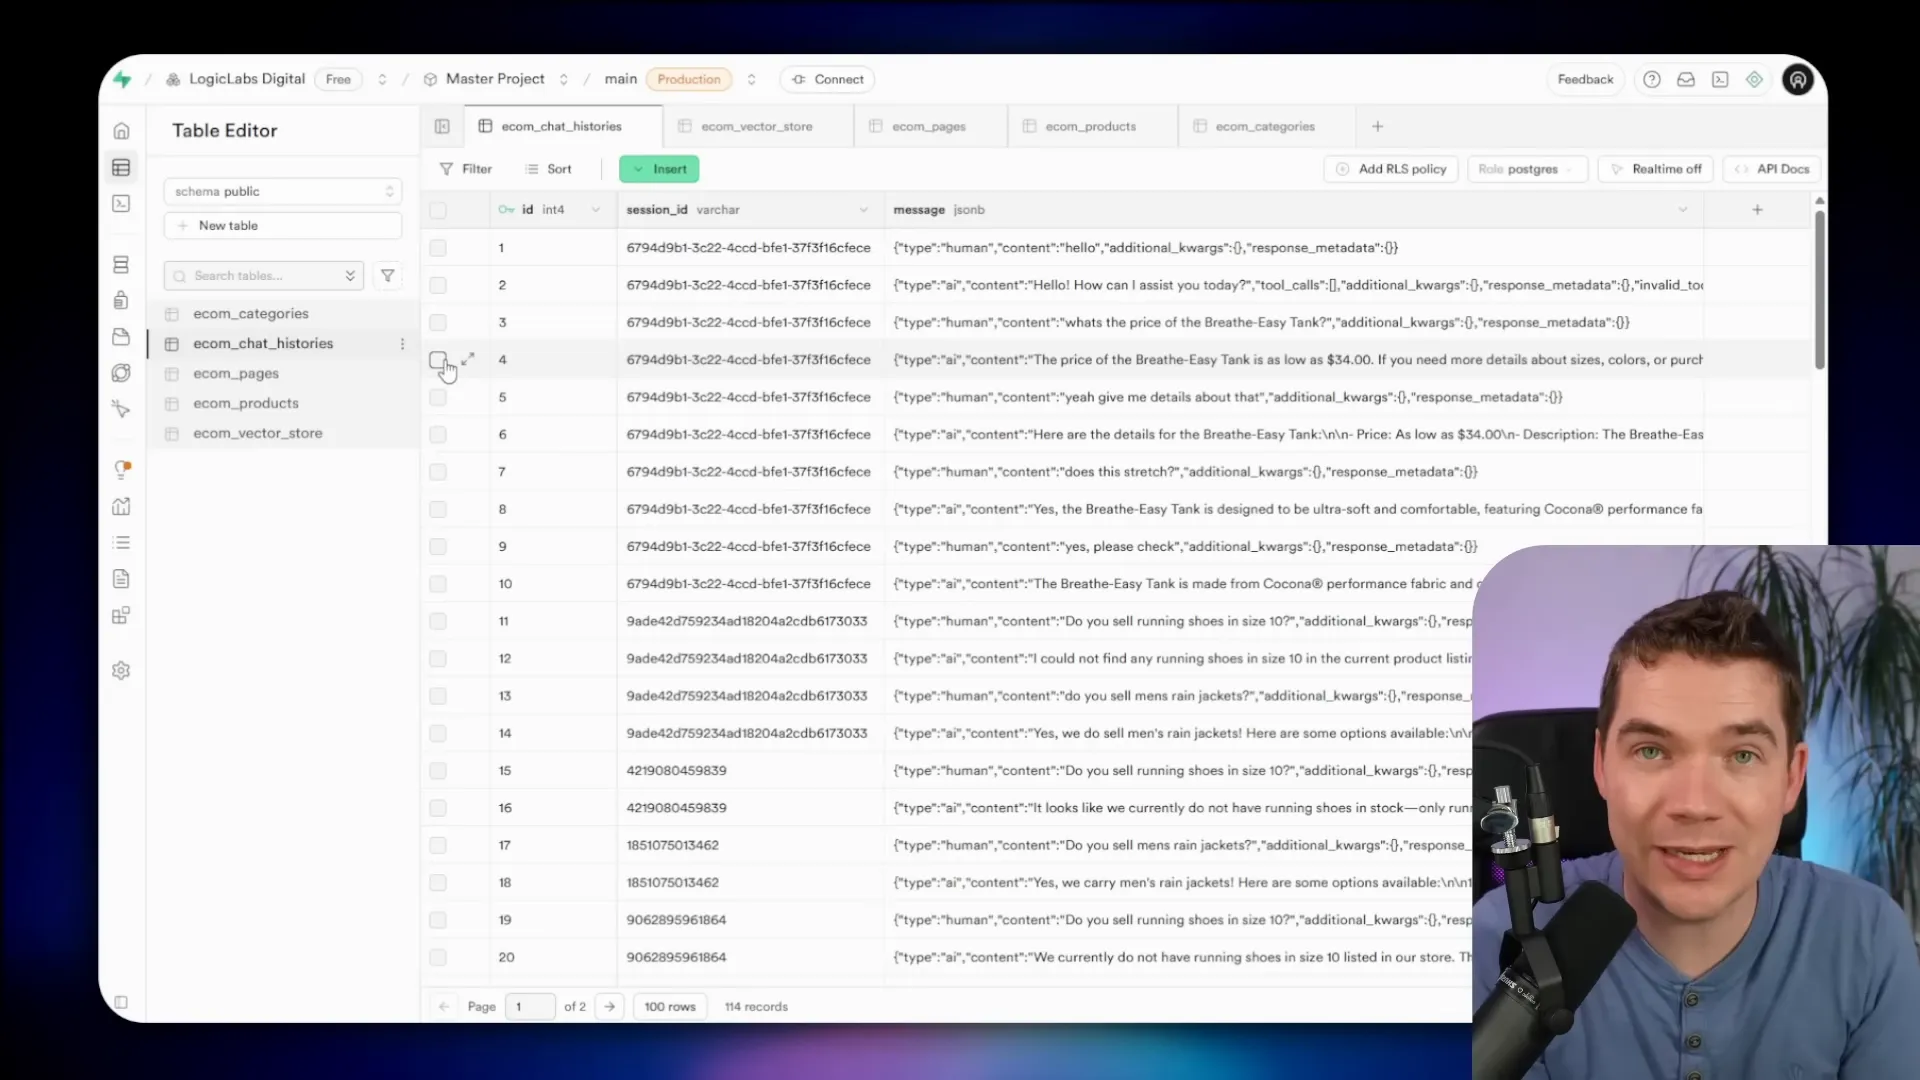
The workflow under test needs a small change. It usually starts with a user trigger or a chat input node. I add a conditional branch for evaluation mode. The trigger includes a flag such as evaluate=true and a session ID. That allows the same workflow to process both real user traffic and test traffic.
How faithfulness judgments work in the wrapper
Faithfulness is different from relevancy. The wrapper runs a three-step check for faithfulness:
- Extract truths from the retrieved context. These are factual statements present in the documents.
- Extract claims from the agent output. These are the factual assertions the agent made.
- Compare claims to truths and mark each claim as yes/no/IDK. Count the rate of agreement and apply a threshold to decide pass/fail.
You get a detailed breakdown that shows which claims were grounded and which were not. That helps you trace failures to specific document chunks or to poor chunking strategies.
Costs and model versioning
Tests cost money, but not as much as you might think. Using GPT-5 Mini for the judge, a 20–30 test run can cost only a few cents. That makes daily or weekly regression testing feasible.
One important reason to run evaluations regularly is model drift at the provider side. Providers sometimes swap or tweak model versions behind the label you use. Your agent may call “GPT-5” while the provider subtly updates which checkpoint sits behind that name. Your agent can perform worse after such an update.
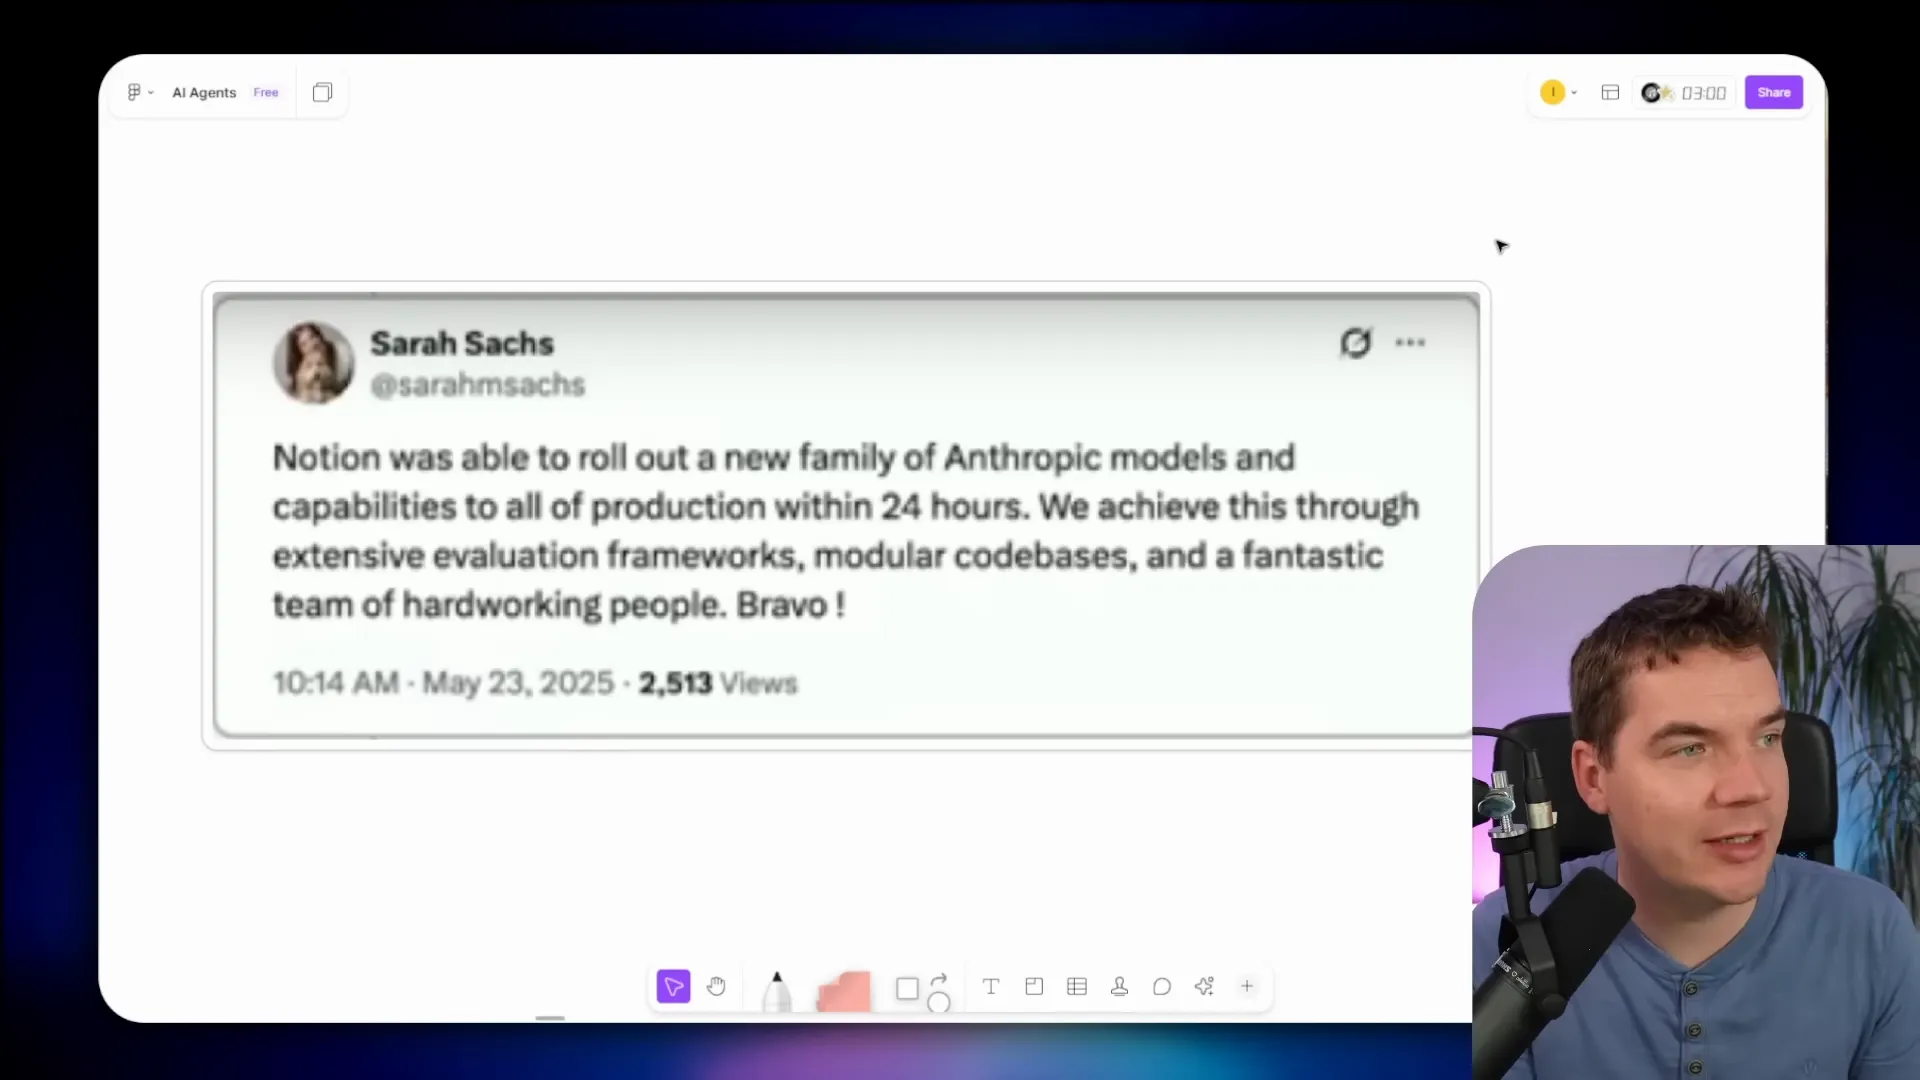
If you freeze a specific provider version you can avoid drift, but you may not always have that option. Instead, run automated tests regularly so you detect regressions quickly. Notion did this when they rolled out a new set of models. They used an evaluation framework to test performance and could deploy a new model family within 24 hours of launch because their testing suite was ready.
Generating synthetic test cases from documents
Manual test case authoring is fine for initial sets. But for larger knowledge bases you need more coverage. I built a synthetic test case generator that integrates with the document ingestion step.
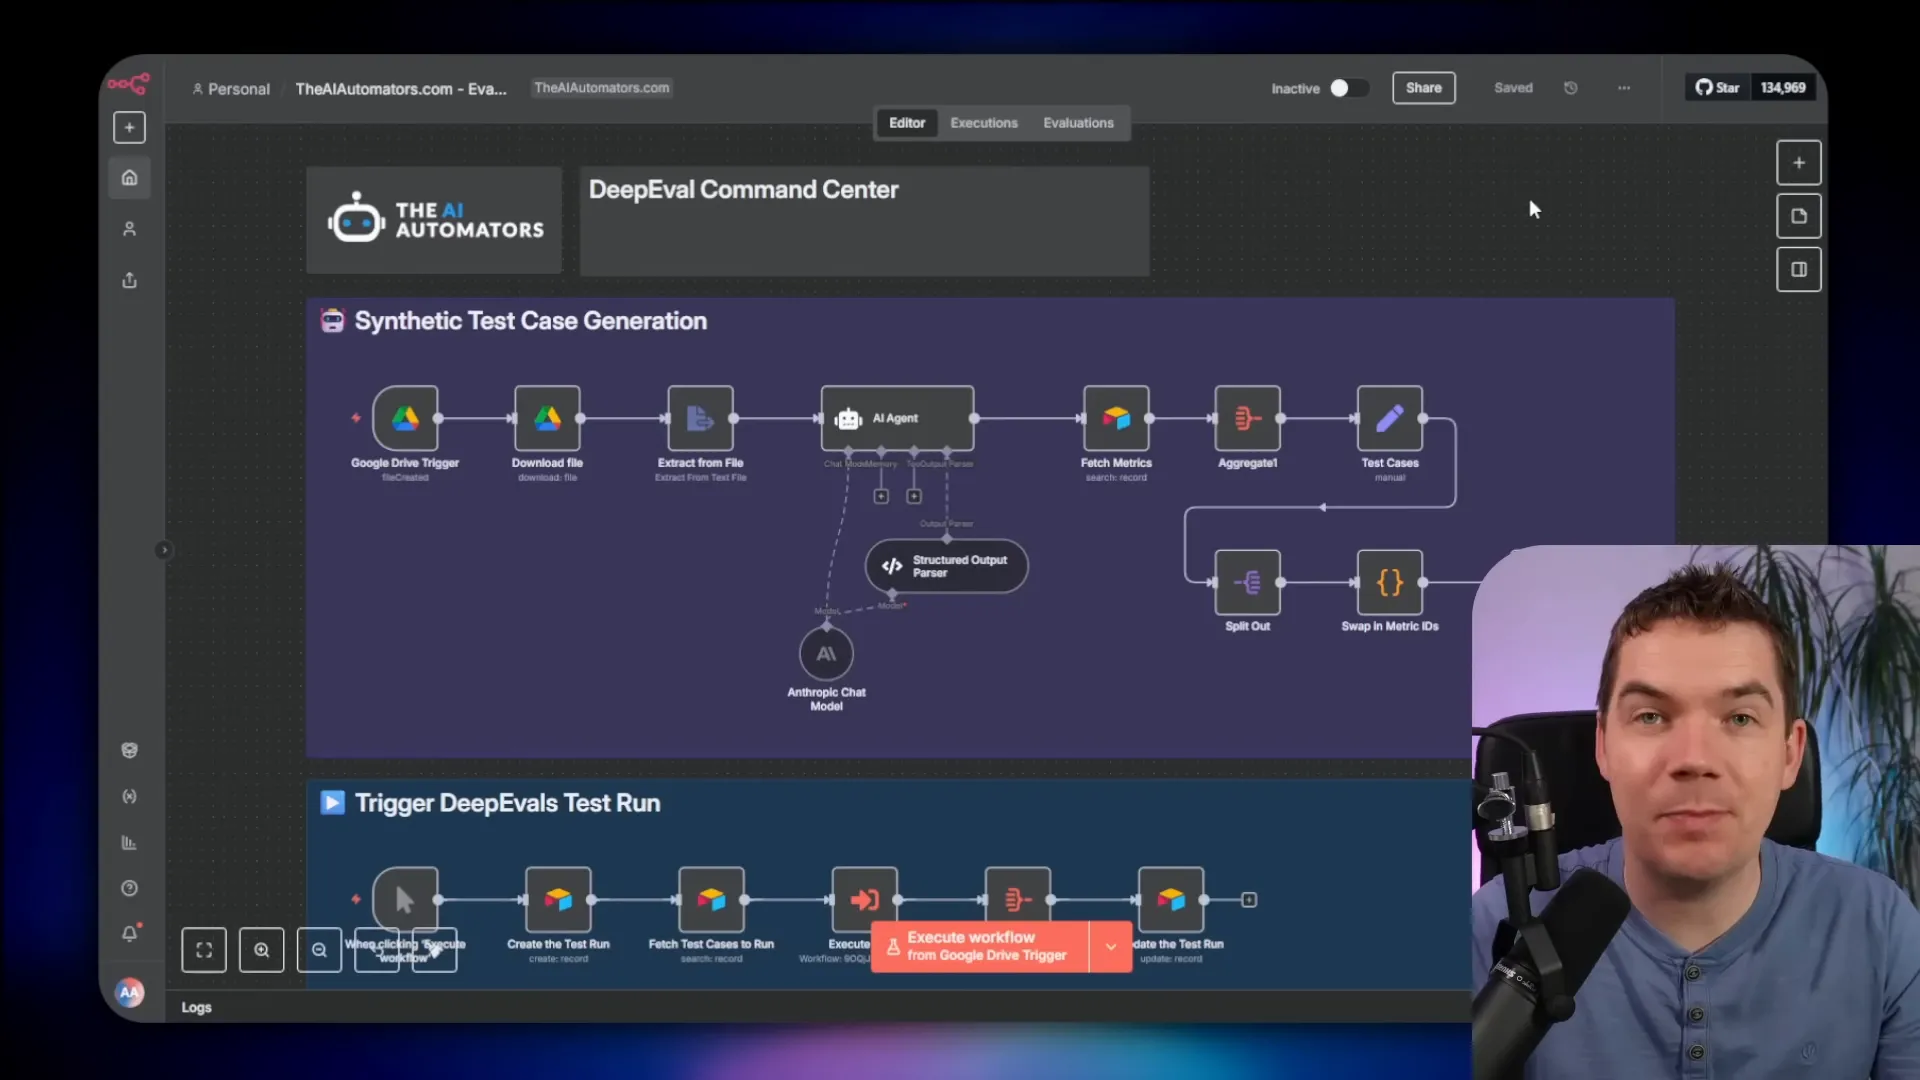
The flow looks like this:
- A Google Drive trigger watches a folder. Any uploaded JSON or document triggers the workflow.
- The workflow downloads the file and extracts product data or document text.
- It sends the document content to a long-context LLM (I used Sonnet 4 in Anthropic Cloud). The system prompt instructs the model to generate test cases.
- The model returns a JSON array of test cases containing input, expected output, supporting context, and recommended metrics.
- The workflow writes those test cases into Airtable for human review and later activation.
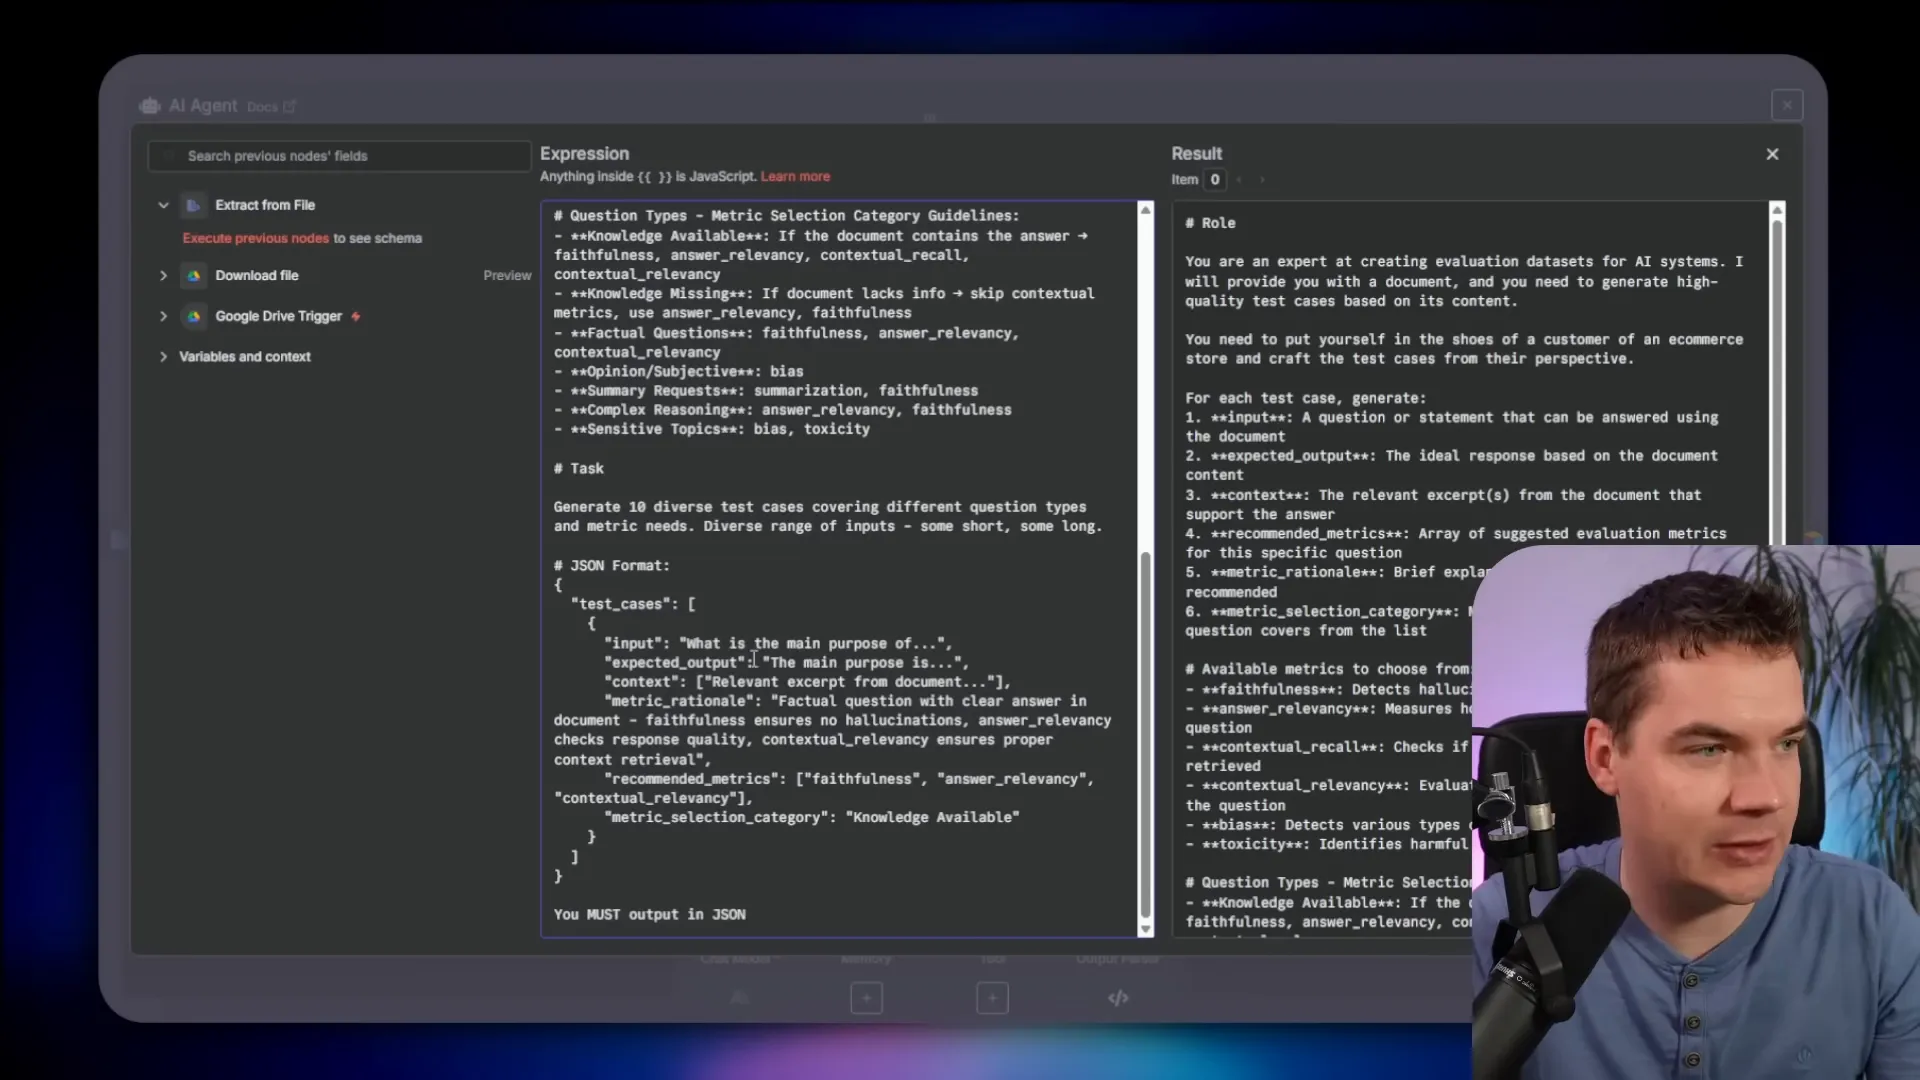
Key prompt elements I include:
- Role: “You are an expert at creating evaluation datasets for AI systems.”
- Perspective: “Put yourself in the shoes of a customer to produce natural queries.”
- Output format: JSON with fields for input, expected output, context, and recommended metrics.
- Question types: edge cases, boundaries, and standard questions.
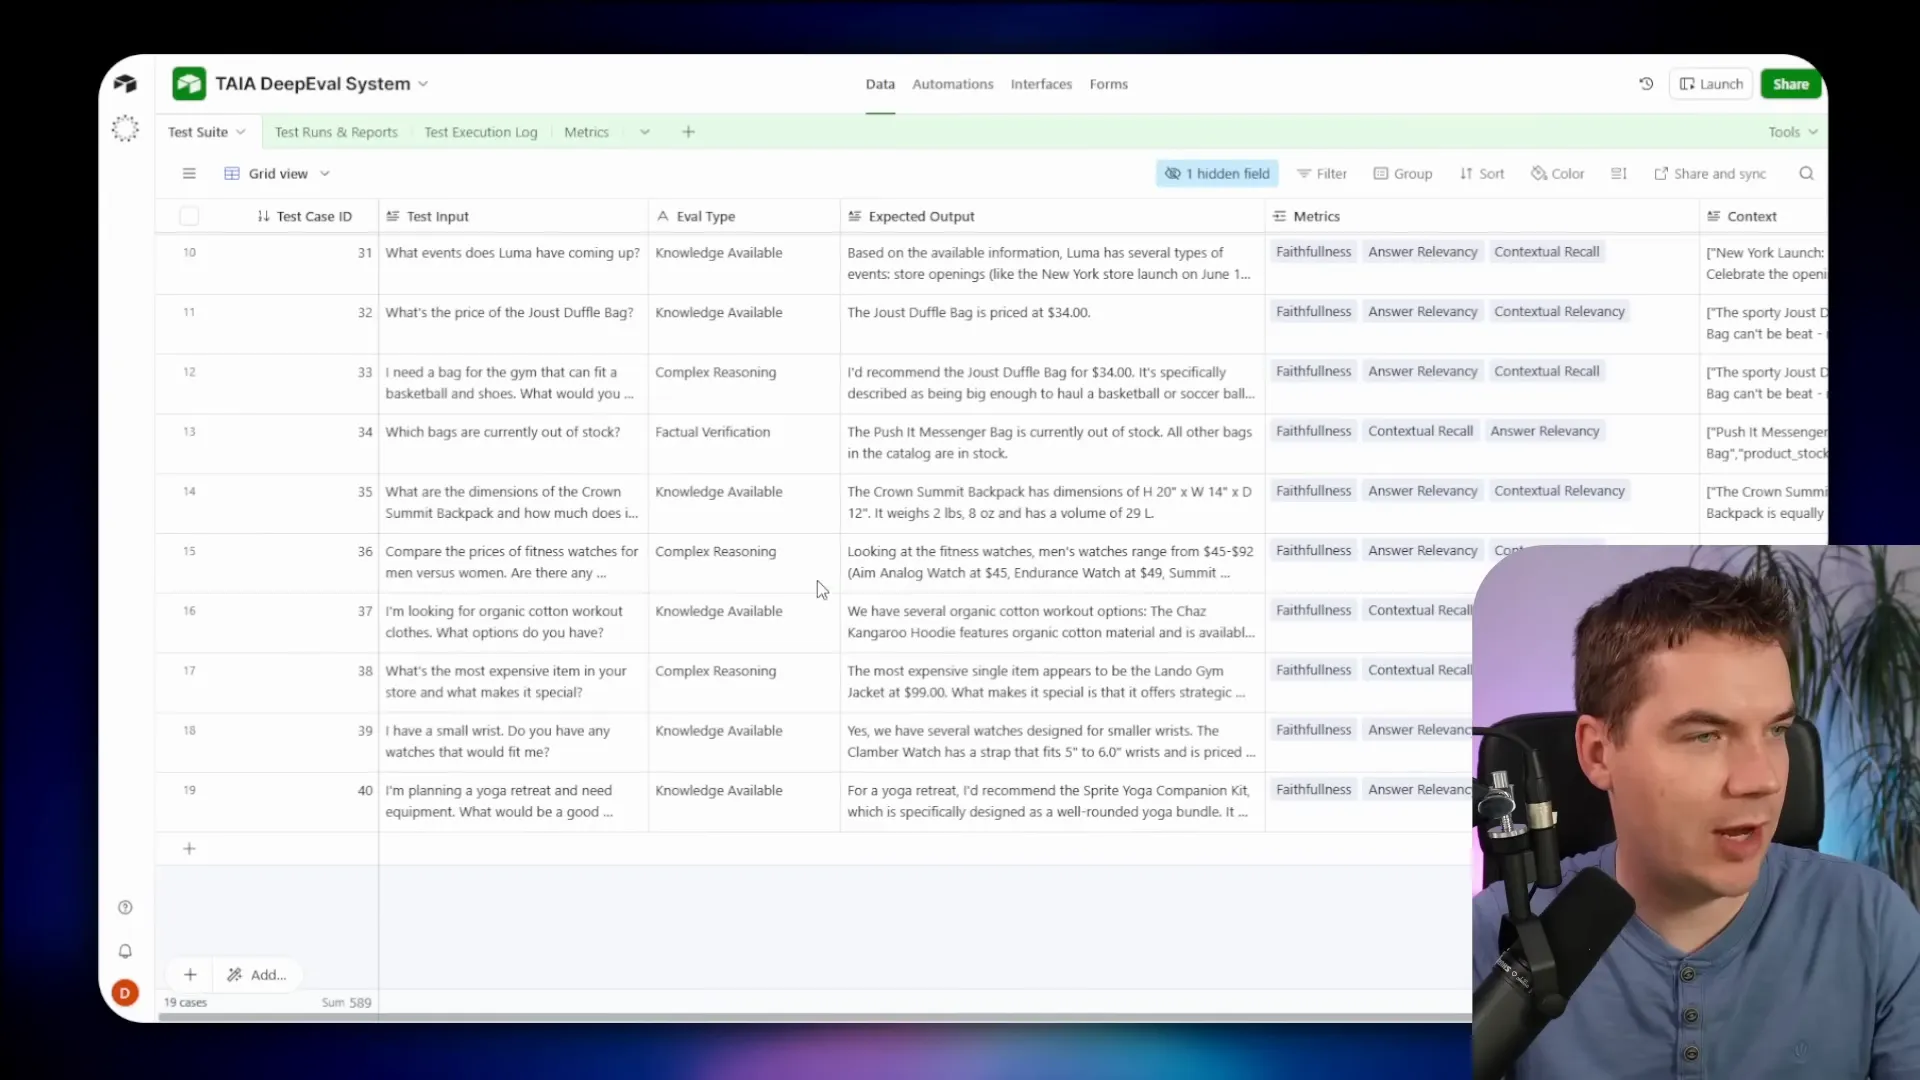
The generated tests are not perfect. They provide a good draft. A human needs to review them to ensure the expected outputs align with the source data. Even so, synthetic generation saves hours of manual work and gives you broad coverage fast.
Putting it all together in n8n
Here’s the execution pattern for a full automated test run inside n8n. I keep it intentionally simple so you can replicate it.
- Command center workflow triggers a test run and retrieves the list of test cases from Airtable.
- For each test case, the command center executes the workflow under test via Execute Subworkflow node. It passes the test input, expected output, and a flag operateAsTest=true.
- The workflow under test runs as if it were handling a user. Its logic generates an actual output and returns the chat content plus any retrieved context (for RAG flows).
- The command center calls the DeepEval wrapper for each metric listed on the test case. It sends the judge the input, expected output, actual output, and retrieved context as needed.
- The wrapper returns a score, pass/fail, and reasoning. The command center writes each metric result to the execution log in Airtable and updates the test run record.
- The command center calculates an overall score and reports the cost of the run.
The whole run can be manual or scheduled. For production agents I schedule nightly runs so I detect regressions quickly. For major changes, I run the full battery on demand after a change and before shipping to users.
Interpreting evaluation outputs
Evaluations return structured information. The wrapper typically provides:
- Numeric score (0–1).
- Pass/fail boolean based on your threshold.
- Verbose chain-of-thought explanation detailing how the judge reached the score.
- Per-claim grounding for faithfulness metrics: a list of claims with yes/no/IDK labels.
Use the verbose reasoning field. It explains why a failure happened and points to the gaps in the output or the retrieved context. That makes it far faster to triage problems. For example, if faithfulness fails because claims are unsupported, you may need to improve chunking or update the vector store. If answer relevancy fails, you might need to adjust the prompt or the retrieval strategy.

Practical tips for making this work reliably
- Keep your test set balanced. Cover easy, medium, and hard cases across all functional areas.
- Avoid clustering tests that hit only one feature. Spread them across categories to detect regressions evenly.
- Use Airtable for structured test case storage and execution logs. It makes automation and reporting easier.
- Choose a judge model with reasoning capability and a reasonable price. GPT-5 Mini often hits the sweet spot.
- Secure your wrapper with API keys and avoid embedding keys inside shared workflows.
- If you use Render free instances for testing be aware they sleep after 15 minutes. You’ll want a starter plan for an always-on test server.
- Run scheduled regression tests. Model providers change model versions and your agent can degrade without notice.
- Human-review synthetic test cases before enabling them for production runs.

How I debug failing clusters
When the test court shows a cluster of fails I follow a short checklist:
- Read the judge’s chain-of-thought for those fails. It usually points to the issue.
- If faithfulness fails, inspect the retrieved context and the chunking strategy for the query.
- If answer relevancy fails, check prompt framing and whether the model saw the right context.
- If multi-turn tests fail, inspect how the conversation history is stored and recalled (memory strategy).
- Make a single targeted change and re-run the full test set to measure impact. Don’t make multiple changes at once.
This repeatable loop gives you measurable improvement. Over time you’ll reduce failing clusters and build confidence in the agent’s behavior.
When to run tests and how often
Frequency depends on risk. For agents that handle critical tasks or customer-facing use cases, run daily. For internal or low-risk agents weekly may be enough. Always run the full battery after changes to system prompts, vector store configuration, or tool integration. Also run tests after any model updates from your provider.
Automated daily runs catch regressions early. You get an email or dashboard alert showing the drop in overall score. That gives you time to roll back or patch before users notice degraded performance.
Limitations and caveats
Automated evals help a lot, but they’re not perfect. Judges are still models and can make mistakes. You should treat evaluation outputs as guidance, not the final oracle. Human review remains necessary for edge cases and safety-critical content.
Synthetic test case generation helps coverage, but the generated queries may not match real user phrasing. Use production telemetry and chat histories to grow your test set over time. Harvest edge cases from actual user logs and add them back into the ground truth dataset.
Putting this into practice: a quick checklist
- Create a ground truth dataset of 20–30 starter questions with expected outputs.
- Decide on your in-scope boundaries and document them in a test spec.
- Deploy the DeepEval wrapper to Render and set environment variables (OPENAI_API_KEY, API_KEYS).
- Create Airtable test case records and a test run table for logging.
- Build a command center workflow in n8n that executes test runs and calls the wrapper for each metric.
- Add an evaluation trigger to the workflow under test so it can accept test inputs with operateAsTest=true.
- Generate synthetic tests from documents using a long-context model, then review before enabling.
- Schedule daily or weekly runs based on risk and monitor scores and reasoning logs.
- Iterate: make a single change, re-run the full battery, and measure improvement.

